If that’s the case, your app may benefit from extending Remake’s backend code.
The backend of Remake contains the
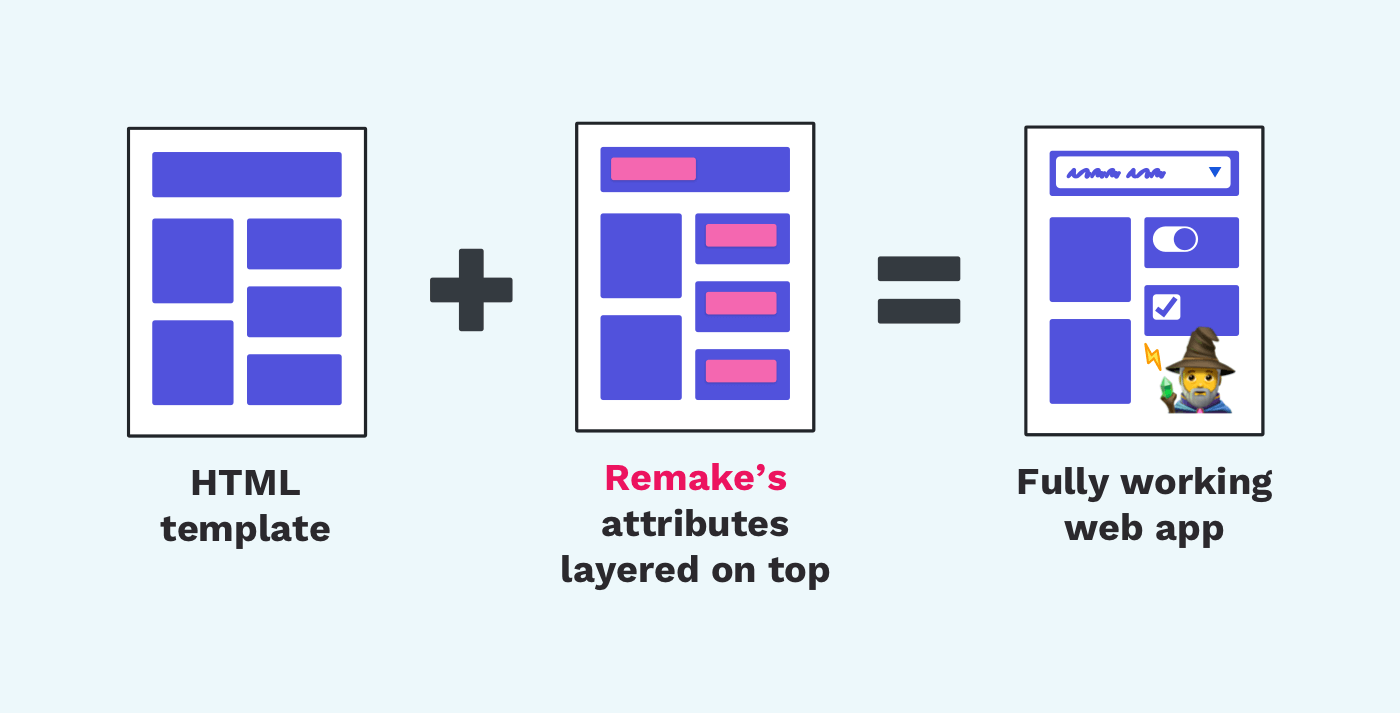
]]>As you’re building your web app, you may encounter times where you need to do more with your app than what Remake does for you.
If that’s the case, your app may benefit from extending Remake’s backend code.
The backend of Remake contains the JavaScript code that runs on your server, which is different from the frontend code that runs in your users' web browsers.
The backend code gives us the ability to integrate our server with other Node libraries and web APIs, allowing us greater control over Remake’s power, and opening up new app possibilities! ✨
Important: If you want to use Remake's built-in hosting service (i.e. with the command remake deploy), you won't be able to deploy your modified backend code. So, if you to work with modified backend code, you need to host Remake yourself.
How we'll customize Remake's backend
The project we will build is a statistics panel, which will give us some stats about how our web app is being used.
Note: As with all web apps, user data privacy is important, so remember to follow any applicable user data privacy laws. Privacy law compliance is a topic outside the scope of this tutorial, but do not forget that it is also a very important topic for all web app developers to understand!
After this tutorial, you should feel more comfortable extending Remake’s backend with your own backend code.
Want to skip to the code? All the source code from this tutorial
💡 If you get stuck and a Google search doesn’t get you the relevant information, feel free to swing by Remake's community chat on Discord and ask for help. We’re very friendly!
Setup
We’ll start with the default Remake project, which we’ll generate the normal way using the remake-cli utility.
In your terminal, create a new remake project using the following command:
npx remake create backend_projectWhen asked to pick a starter template, choose Default Starter.
Now inside the backend_project folder, we have our new project files.
You can make sure the application was generated correctly by changing directory into the backend_project folder and running npm run dev:
cd backend_project
npm run dev
Once the server starts, navigate to http://localhost:3000/ in your web browser while it’s running.
Since there’s not much there, let’s fill our app/pages/app-index.hbs file with the default todo list starter code:
<div object>
  <ul array key="todos" sortable>
    {{#for todo in todos}}
      <li
        object
        key:text="@innerText"
        edit:text
      >{{default todo.text "New todo item"}}</li>
    {{/for}}
  </ul>
  <button new:todo>Add Todo</button>
</div>
Refresh your page and you should see a basic todo list app after you create an account and log in.
Components
To extend Remake, we’ll first start with a look at _remake/main.js, and the files inside _remake/lib/ as well. In order to modify Remake, we first have to know a bit about how it works!
Express Server (main.js)
Remake’s backend uses the Node Express framework for routing, Passport.js for authentication, and json for storing data on the server. In the main.js file, you’ll find 2 function calls beneath a comment called “REMAKE CORE FRAMEWORK”, called initApiNew and initApiSave. Those are the ones we’ll be adding callbacks to in this tutorial.
API Endpoints
Remake’s frontend and backend communicate in two ways: initially when pages load, and also after the page is loaded, through endpoints. API endpoints are just URLs the backend provides for the frontend to call. The files that do this are within the _remake/lib folder. Don’t be afraid to open them up and look at what they do!
Here are the endpoints of interest to us:
/new/endpoint- Called when a new item is created by the user.
- Contained in init-api-new.js
/save/endpoint- Called when something is changed by the user.
- Contained in init-api-save.js
Callbacks
The easiest way to hook into Remake’s behavior on the backend would be to use callbacks. Unfortunately, Remake doesn’t yet have backend callbacks. So let’s add them right now!
Adding Callbacks
initApiNew
In the file _remake/lib/init-api-new.js, add the following code to the function definition of initApiNew:
export function initApiNew ({app}, callback) {
Inside this function there is an app.post call. We need to call our callback at the end of this function provided to app.post, right below the final res.json call:
if(callback != null)
  callback({
    app,
    user: {
      name: currentUser.details.username,
      email: currentUser.details.email
    },
    data
  });
This callback will cause Remake to provide us with the user details (name and email) and copy of the data when a user creates a new entry. We’re also passing the app itself as the first parameter, since it’s always useful to have.
Now in your _remake/lib/main.js, we’ll provide our newly changed code with our own callback to log the data mentioned above:
initApiNew({ app }, ({app, user, data}) => {
  console.log(“initApiNew callback data: ”, data);
});
Save and test the above code using npm run dev. Using your web app, add a new item to the todo list. In the server console, you’ll notice we now see the data logged.
Callbacks allow code separation, so we can more easily maintain our application’s custom behavior across remake updates. But they sometimes aren’t enough. So let’s explore other customization options.
initApiSave
Let’s do the same thing for the save endpoint in init-api-save.js.
export function initApiSave ({app}, callback) {And underneath res.json({success: true}));, add the following code:
if(callback != null)
  callback({
    app,
    user: {
      name: currentUser.details.username,
      email: currentUser.details.email
    },
    data: {
      newData: existingData,
      oldData
    }
  });
We’ll also need to get a copy of the old data, since it’s changed in this function. On line 36, underneath the declaration of oldData, add:
let oldData = {...existingData};I’ve chosen to provide not just the data in the callback, but the old data as well. This won’t be used in our application, but would be useful for purposes where you need to know the data that changed.
Let’s call the callback to check that it works. Do this in main.js:
initApiSave({ app }, ({app, user, data}) => {
  console.log(“initApiNew callback data: ”, data);
});
Since we are not using file uploads, we will not be adding a callback to the upload endpoint. But you could do so if you have a need for it.
Custom Backend Code
Combining what we know from the changes above, we can replace the 3 init function calls in main.js with initBackend({app}), a function we’ll write and store in backend.js, which we’ll put inside our app folder in the project directory.
First, in Remake’s main.js file, let’s import our backend. Beneath the other imports, add this:
let backend = null;
try {
  backend = require("../app/backend"); // optional
} catch (err) {
  if (err.code != “MODULE_NOT_FOUND”) {
    throw err;
  }
}
We’re going to make this import optional since requiring the backend file would break Remake if it wasn’t there.
Then, we’ll replace the 2 initApi calls in _remake/lib/main.js with this code. We’re also going to add an optional init function for our backend and have it run prior to the initRenderedRoutes function, which will allow us to override Remake’s default routes.
// REMAKE CORE FRAMEWORK
initUserAccounts({app});
initApiNew({app}, backend.onNew);
initApiSave({app}, backend.onSave);
initApiUpload({app});
if (backend.init != null) {
  backend.init({app});
}
initRenderedRoutes({app});
Now create a new file backend.js in your app folder with the contents. Notice we are moving our callbacks into this file:
const onNew = ({app, user, data}) => {
    console.log("onSave callback data:",
    "\nUser:", user.name,
    "\nData:", data.data
  );
};

const onSave = ({app, user, data}) => {
  console.log("onSave callback data:",
    "\nUser:", user.name,
    "\nOld Data:", data.oldData,
    "\nNew Data:", data.newData
  );
};

const init = ({app}) => {
  console.log("Custom backend initialized...");
}

const run = ({app}) => {
  console.log("Custom backend running...");
};

export { init, onNew, onSave, run };
We’ve also added another function, run, which we’ll call from Remake after it has started.
Inside of Remake’s main.js at the bottom of the the app.listen callback, call our run function:
app.listen(PORT, () => {
  console.log('\n');
  showConsoleSuccess(`Visit your Remake app: http://localhost:${PORT}`);
  showConsoleSuccess(`Check this log to see the requests made by the app, as you use it.`);
  console.log('\n');

  if (process.send) {
	process.send("online");
  }
  backend.run({app});
});
Now would be a good time to test your application the same way as before, using npm run dev. You’ll notice that our logging still works, but it has now been moved to our own file.
Our Project
Now that our backend code is running, it would be nice to do something useful besides logging, and this is where your creativity can come in!
For this tutorial, we’ll create a statistics page which will show us some useful information about how our web app is being used.
We’ll measure:
- The most active users of our web app
- The last time someone used our app
Using Callbacks to Measure User Activity
Let’s use our backend callbacks to record some information about user activity. Let’s count the activity of each user by counting the number of calls to new and save.
The counting is rather simple. It’s just the incrementing of a value that we’ll store in json. We’re also going to use Date.now() to get a timestamp of the last activity, which we’ll also store.
The Stats JSON Database
Tip: If you’re using JSON as a database, as Remake does, an important thing to remember is to be careful when using async/await or callbacks. If you’re reading in data, changing it, and writing data, there is a real chance the database gets opened and changed in another place in your code as well, opening up the real risk of data loss.
For this reason we’re using synchronous calls when working with the JSON and being careful to make sure node is not allowed to do a context switch while in the middle of working with a file. For more information about this concept, research transactional data and asynchronous programming.
For our project, we’re going to generate a new json file inside Remake’s json database folder called stats.json. Once populated, the json file will look something like this:
{
  "userActivity":{
    "[email protected]": {
      "activity": 12,
      "lastUseTimestamp": 1610088558699
    }
  },
  "lastUseTimestamp": 1610088558699,
  "lastUser": "[email protected]"
}
As you can see, we will have an entry per-user, with an activity count and a date of the last modification on the user account. This will allow us to see the most active users and the last time each user used the app.
We’re also tracking the last use timestamp out of all users and the last active user’s email.
Populating the Database
We’re going to make our new stats file create itself if it doesn’t exist, and fill in fields that don’t exist as we need them.
Since we’re counting both additions and modifications, we’ll need to add our code to both endpoints: new and save. Since this will involve the same code, let’s create a function for incrementing the count.
The following code examples in this section will occur inside a new function inside of backend.js called incrementUserActivity, which will take one object parameter containing the name and email of the user that did the activity.
Here is the stub:
const incrementUserActivity = ({name, email}) => {
  // our new code will go here...
};
Before we start writing this function, let’s add two imports and set the location for our stats.json file we’ll use at the top of the file:
const jsonfile = require("jsonfile");
const path = require("upath");
const statsFile = path.join(__dirname, "data/database/stats.json");
Reading JSON
The code below shows how to read a JSON file synchronously. If the file does not exist, an exception will be thrown, and if that happens, we will create it. Put the following code inside our new incrementUserActivity function.
  // open or create a stats.json file if it doesn't exist
  let stats = {};
  try {
    stats = jsonfile.readFileSync(statsFile);
  } catch (err) {
    if (err instanceof Error && err.code == “ENOENT”) {
      // file not found? create it!
      jsonfile.writeFileSync(statsFile, {});
    } else {
      // unknown error, rethrow
      throw err;
    }
  }
Set Default Stats
At the first run of our application, our stats.json won’t exist. The code we wrote previously will create it, but it will still start empty. Because of this, default values are needed to be filled in if they don’t exist.
Similarly, if an entry for a specific user doesn’t yet exist, we’ll create that too and set the initial activity counter to 0:
  // create user activity entry in stats.json if it doesn't exist
  if(stats.userActivity === undefined) {
    stats.userActivity = {};
  }

  if(stats.userActivity[email] === undefined) {
    stats.userActivity[email] = {};
  }

  if(stats.userActivity[email].activity === undefined) {
    stats.userActivity[email].activity = 0;
  }
Recording Our Data
As we talked about before, we’ll increment the activity counter stored in the current user and keep a timestamp of when it happened in two places, as well as the email of the last user to use the app.
  stats.userActivity[email].activity += 1;
  let timestamp = Date.now();
  stats.userActivity[email].lastUseTimestamp = timestamp;
  stats.lastUseTimestamp = timestamp;
  stats.lastUser = email;
Writing JSON
Writing our data into the stats.json file at the end of the function is simple, as it involves only one call:
jsonfile.writeFileSync(statsFile, stats, {spaces:2});The spaces option is provided so that the json is formatted with 2 spaces per “tab” so we can read it easily.
Calling Our Function
Our incrementUserActivity function should be called from both endpoints: new and save.
Here’s how we call our function:
const onNew = ({app, user, data}) => {
  incrementUserActivity(user);
};

const onSave = ({app, user, data}) => {
  incrementUserActivity(user);
};
Before you test, make sure to cause some activity to happen by adding or changing some items and viewing stats.json to see the changes.
The Statistics Page
To make our app display the stats, we need to add a new /stats/ route inside our backend’s init function.
Stats Route
The most quick and dirty approach to displaying the states would be logging them to the page and to the server console. Let’s try that first:
const init = ({app}) => {
  // Create the route for our page at /stats
  app.get("/stats", (req, res) => {
    res.set('Content-Type', 'text/plain'); // plain text page
    res.write("Stats:\n\n");
    try {
      const stats = jsonfile.readFileSync(statsFile);
      console.log(stats);
      res.write(JSON.stringify(stats, null, 2));
    } catch (err) {
      res.write("{}");
    }
    res.end();
  });
};
Now would be a good time to test. Firstly, make sure there is some activity in your todo list to log. Then, navigate to https://localhost:3000/stats/.
Restricting the Page
Since this isn’t a frontend tutorial, and only one user will see this page, we won’t be implementing any fancy template rendering. Instead we’ll render a very simple stats page which we’ll restrict to a single user called admin.
When you test this code, remember to be logged in as admin, or change the code below to match your username.
Begin by wrapping the route code in the following if statement. We’ll also set the page to plain text, since that’s how we’ll render the stats.
app.get("/stats", (req, res) => {
  res.set(“Content-Type”, “text/plain”); // plain text page
  if(req.isAuthenticated() && req.user.details.username === "admin") {
    // only admin user can see this...
  }else{
    res.status(403); // not authorized
    res.end();
  }
  // ...
Read Stats
Inside the above if statement, we’ll read the json stats similarly to how we did it before, and we’ll check to see the stats are empty:
  let stats = {};
  try {
    stats = jsonfile.readFileSync(statsFile);
  } catch (err) {
    // ignore file not found, otherwise throw
    if(!(err instanceof Error) || err.code !== "ENOENT")
      throw err;
  }
  if(stats == null || stats.userActivity == null) {
    res.write(“No stats recorded!”);
    res.end();
    return;
  }
This will read from our stats file and render a message to us if there are no stats recorded.
Calculate Stats
We can compute the most active user by looping through our stats object, checking each user’s activity, and keeping the most active user found and the activity level. We’ll also add up the total activity level.
  let mostActiveUser = null;
  let totalActivity = 0;
  let mostActivity = 0;
  if(stats.userActivity != null) {
    for(var email in stats.userActivity) {
      let user = stats.userActivity[email];
      if(user.activity != null) {
        if(user.activity > mostActivity) {
          mostActivity = user.activity;
          mostActiveUser = email;
        }
        totalActivity += user.activity;
      }
    }
  }
Render Stats
Here we’ll render each of the stats that we have available:
  if(totalActivity !== null)
    res.write("Total Activity: " + totalActivity + "\n");
  if(stats.lastUseTimestamp != null && stats.lastUser != null)
    res.write("Last Activity: " +
      (new Date(stats.lastUseTimestamp)).toString() +
      " by " +
      stats.lastUser + "\n"
    );
  if(mostActiveUser !== null)
    res.write("Most Active User: " +
      mostActiveUser +
      " (" + mostActivity + ")\n"
    );
  res.end();
We show the total activity, last activity, and the most active user.
Our stats page at https://localhost:3000/stats should look something like this:
Stats

Total Activity: 18
Last Activity: Fri Jan 08 2021 01:19:50 GMT-0800 (Pacific Standard Time)
  by [email protected]
Most Active User: [email protected] (14)
Conclusion
Want to view all the code at once? All the source code from this tutorial
If the code provided in this tutorial isn’t working for you, be sure to check the repository linked at the top of the page. This is where you’ll find the full example listing. If you’re looking for the stats, make sure your username is admin.
Thanks for reading this tutorial! I hope you learned that the Remake backend can be customized and expanded to open up new server-side possibilities. In the future, Remakes backend customization should become easier, but the integration should be similar. Be sure to watch Remake’s development closely as new things are being added frequently!
Bye for now! 😎
]]>My first problem was a problem of my own creation. I read a lot of blog posts online, many of them so good that I save them for later, to re-read and share. I started with a simple page on
]]>This is a story of two problems and two solutions.
My first problem was a problem of my own creation. I read a lot of blog posts online, many of them so good that I save them for later, to re-read and share. I started with a simple page on my website where I just kept a list of those links, and why I enjoyed them. But eventually, the list became slow and annoying to update manually — I wanted an app.
That’s when I came upon my second problem, which was very much not my own: Even for something super, super simple, like I want a page on the Internet where I can share an updated list of links, it takes a lot of work to get something working. The road from idea to prototype is covered with excuses not to build, and I’m sure you’ve felt the same problem.
Remake sweeps away those excuses. I took a few hours on a Friday to sketch out an idea for Shelf.page and build it with Remake.
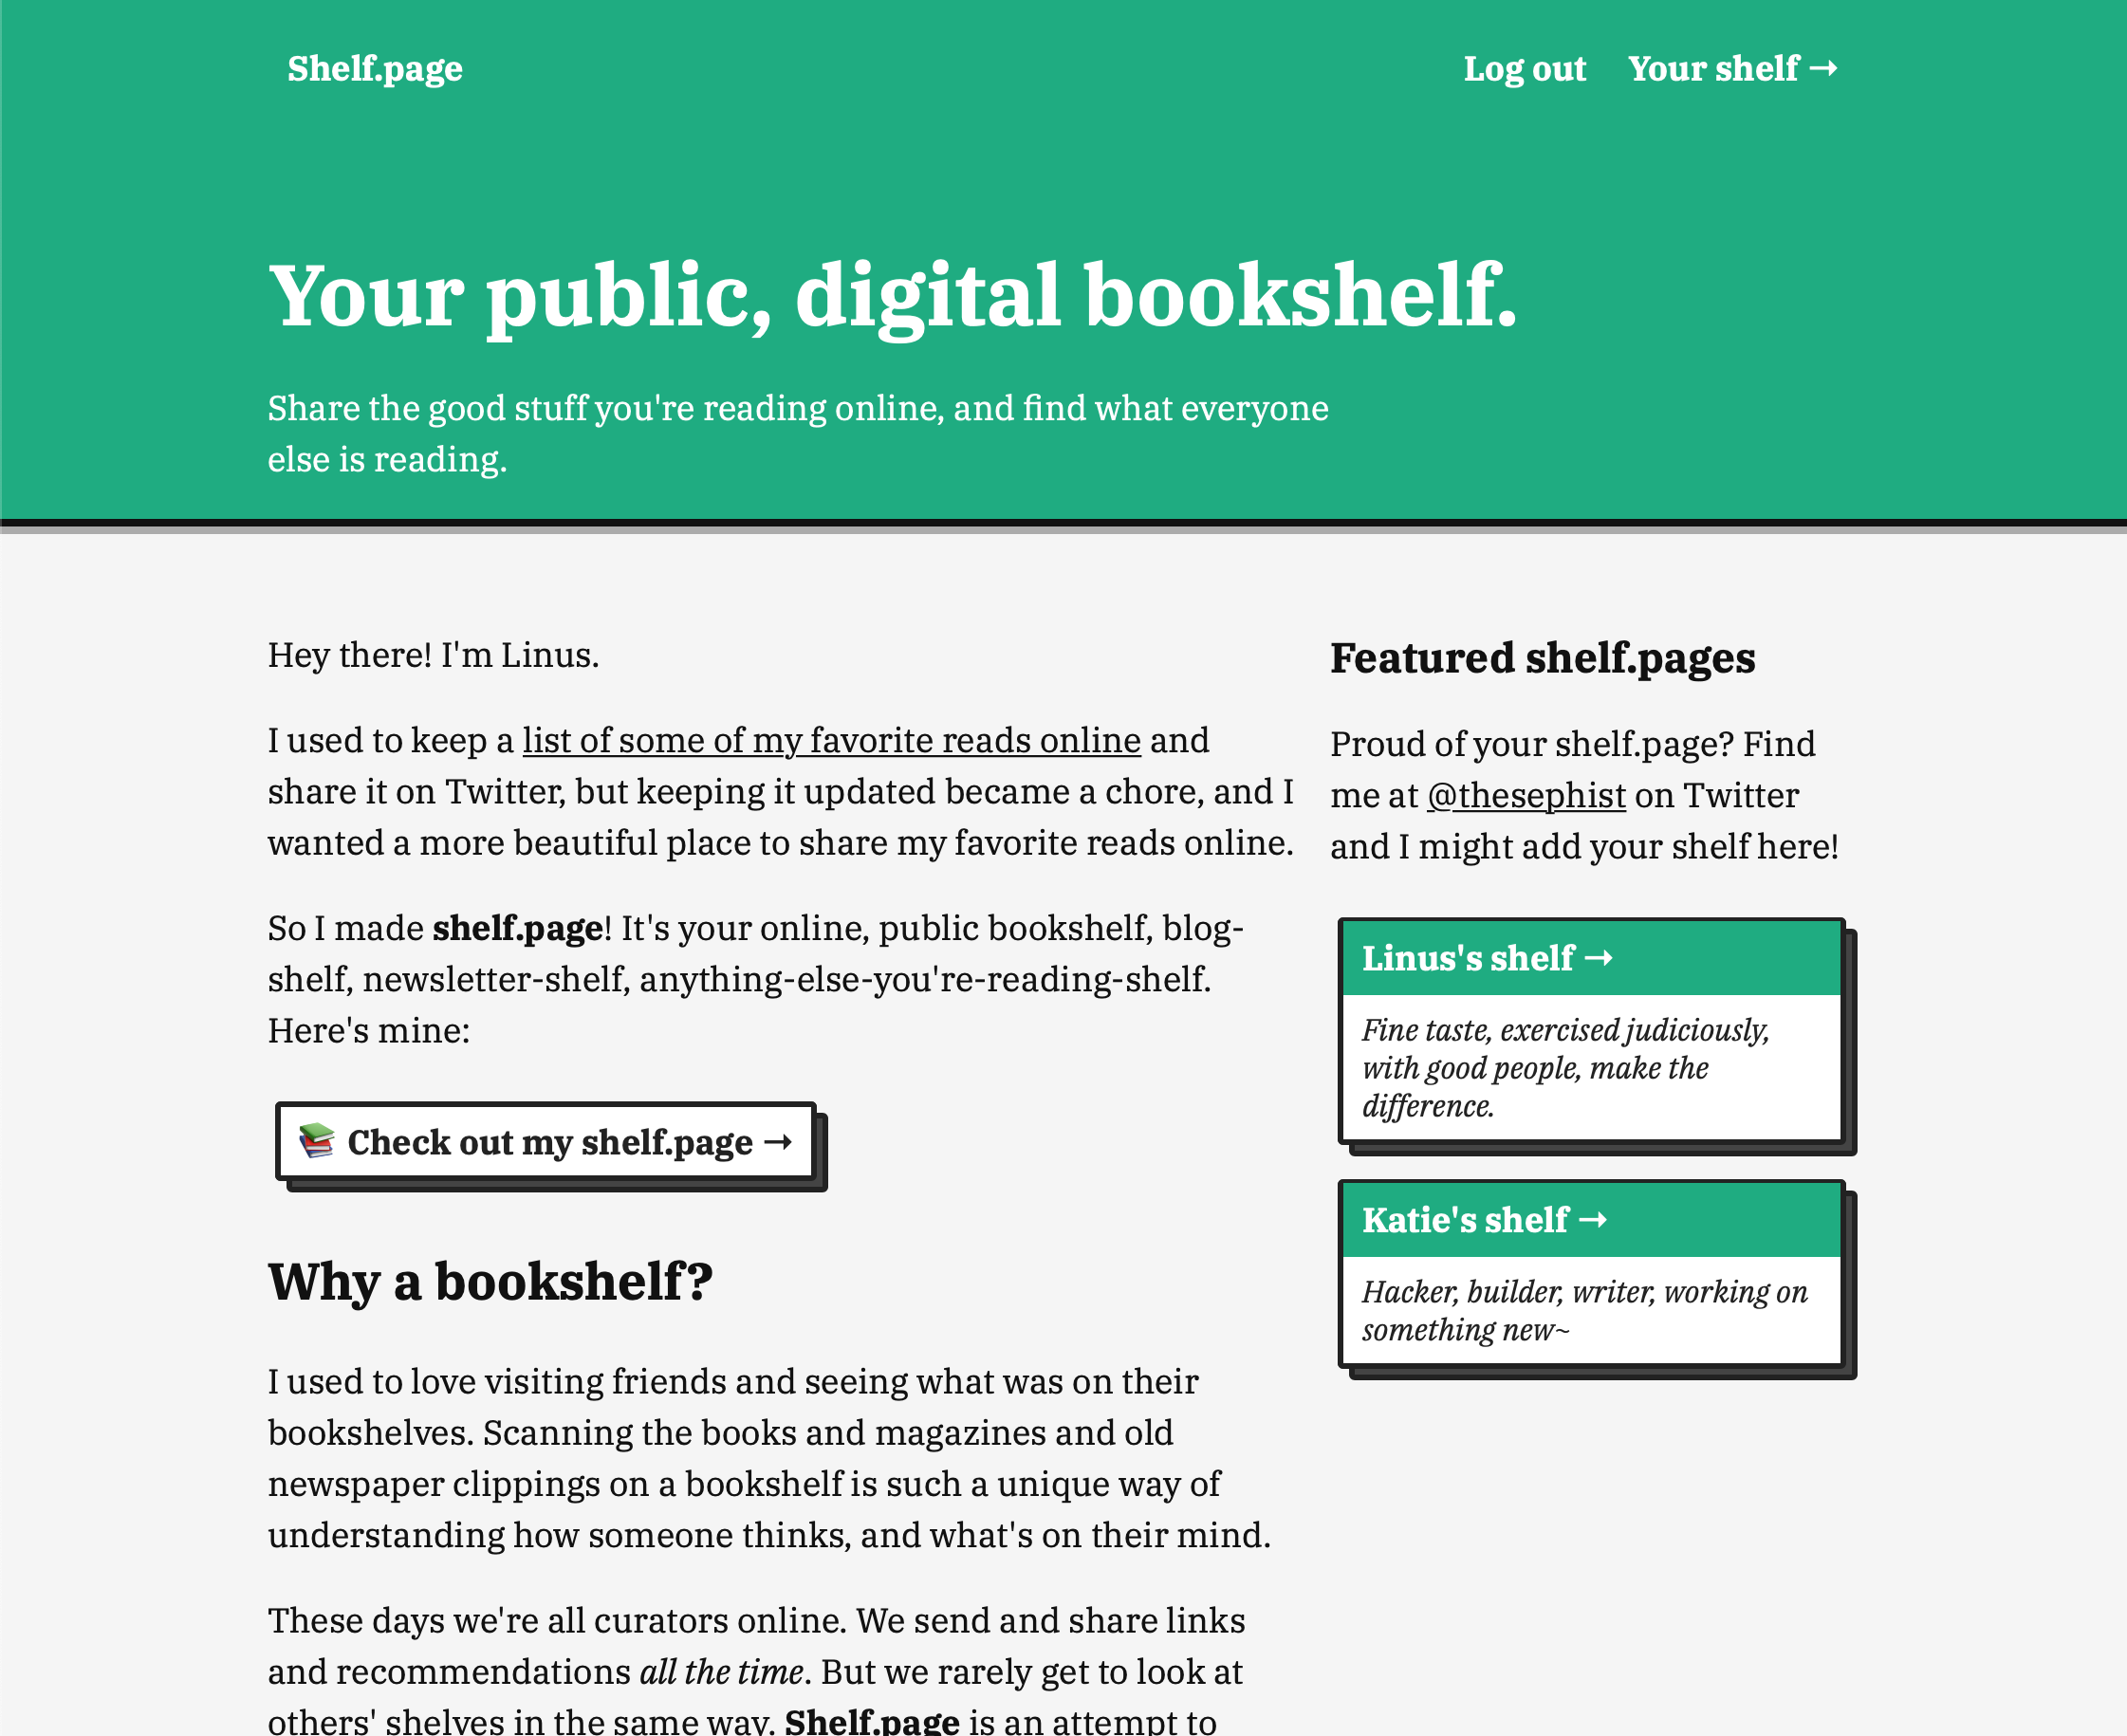
Shelf.page is representative of a really common kind of app. Every user gets a profile or account page at a unique URL, with a bunch of fields to customize their page and edit it themselves.
Remake shines at building these kinds of apps.
Normally, I would spend the first hour or two of starting a project like this: installing tools, setting up a database, and connecting all the components together, but Remake let me build a full-stack app while focusing on just frontend code. This, combined with one-liner deploys and fast builds, makes Remake rocket fuel for building these kinds of single-page apps — I finished Shelf.page in about half the time I expected it to take!
The rest of this post is about Remake, and how it could cut down your time-to-launch to help you build faster, too.
If you already know what Remake is, and want to just get started with code, feel free to skip down to the Create Remake section.
What’s Remake?
Remake lets you write an app by describing your idea in annotated templates, not writing boilerplate code.
When you get down to it, Remake is a framework. And frameworks are always about abstracting out some repetitive, common part of projects. So a good way to understand Remake is to ask, what does Remake abstract for you?
In my experience, Remake is built on three big ideas.
1. Describe your app with annotated templates
The headline feature of Remake is that you can describe your entire app in a few templates. Remake looks at the shape of your data, and some annotations you add to your template, and takes care of making data editable and interactive in your page.
We’ll dive deeper into Remake’s annotations (attributes) later in the post, but here’s a taste. Let’s say you want every user to have an editable “name” field on their account. You can write a template with some attributes, like
<div class="user-name"
  object
  key:name="@innerText"
  edit:name
>{{ name }}</div>
This tells Remake that:
- This field is a property on the user’s account object (
object) - This field should be stored under the label “name” in the user’s account (
key:name) - This field should be editable on the page, for the account owner (
edit:name)
There are a few more directives that combine together to add a layer of editability over your app that’s smart enough to know how you store your data. Combined with Handlebars templates, Remake gives you a way to create fully interactive, editable web pages with just templates sprinkled with annotations.
Write templates that describe how your data relates to your UI, and Remake does the rest. This is a core idea of Remake.
2. Zero-config user accounts and emails
I’ve made lots of side projects over the years, but every time I start a new one, I always need to stop and ask myself if I want to support user accounts, because authentication and account management is an evergreen hassle. Even for prototypes and quick hacks, setting up a database, creating login flows, copy-pasting code from some other project to remember how to implement login securely … all of this takes time, and none of it adds to the actual functionality of the idea I’m trying to bring to life.
Remake apps know how to set up and manage accounts, so in building my own Shelf.page app, I never had to worry about setting up an authentication system. Because I also deployed through Remake’s CLI and platform, user accounts just worked — password resets, login, account pages, the whole thing.
There’s a tradeoff to this zero-configuration setup: There’s not a whole lot you can customize about the login process. It doesn’t support logging in with Google or Apple accounts, for example, and doesn’t support two-factor authentication. But until your idea grows out of the early phase of getting some traction, having to worry little about account management will probably save me hours off each project, and add years to my life.
3. Opinionated ecosystem for one-liner deployments
A lot of the strengths of Remake like zero-config accounts, smart templates, and easy deploys are possible because Remake is opinionated about how your project should be set up.
Like Ruby on Rails or Create React App, Remake comes with a CLI that helps you set up a Remake project. If you follow Remake’s conventions about where files go and how pages are rendered, in return Remake’s CLI also gives you a local development server out of the box and a way to deploy a production app to Remake’s deployment service with a CLI one-liner, remake deploy.
A second benefit of an opinionated design is that, if you have multiple Remake projects, you’ll never have to open up an old project and sit there trying to remind yourself where you put the exact file or page template you’re looking for — every project is roughly structured the same.
Taken altogether, by having a clear, opinionated model of describing how your data is related to your UI, Remake lets you write an app by just describing your idea, not wiring together lots of boilerplate code.
Let’s see how these pillars of Remake come together to actually help build a real app.
Create Remake!
Every Remake project starts the same:
npx remake create shelf
npx is a package runner for NPM libraries — it helps you run commands from NPM packages without installing it globally.
Here, I wanted to create an app called shelf, but you can pick your own name. Once we run the command, Remake will make a new folder named shelf (or a name you pick) with a starter Remake app inside. If you’ve used Create React App, this might feel familiar.
To test out the starter app, we can cd into the new project and run the dev server:
cd shelf
npm run dev
Remake will take a second to build the app, and start running the app at localhost:3000. Visit the URL on your computer to see the starter app, which is a Trello clone. You can also find this demo on the Remake website. It should look like this.
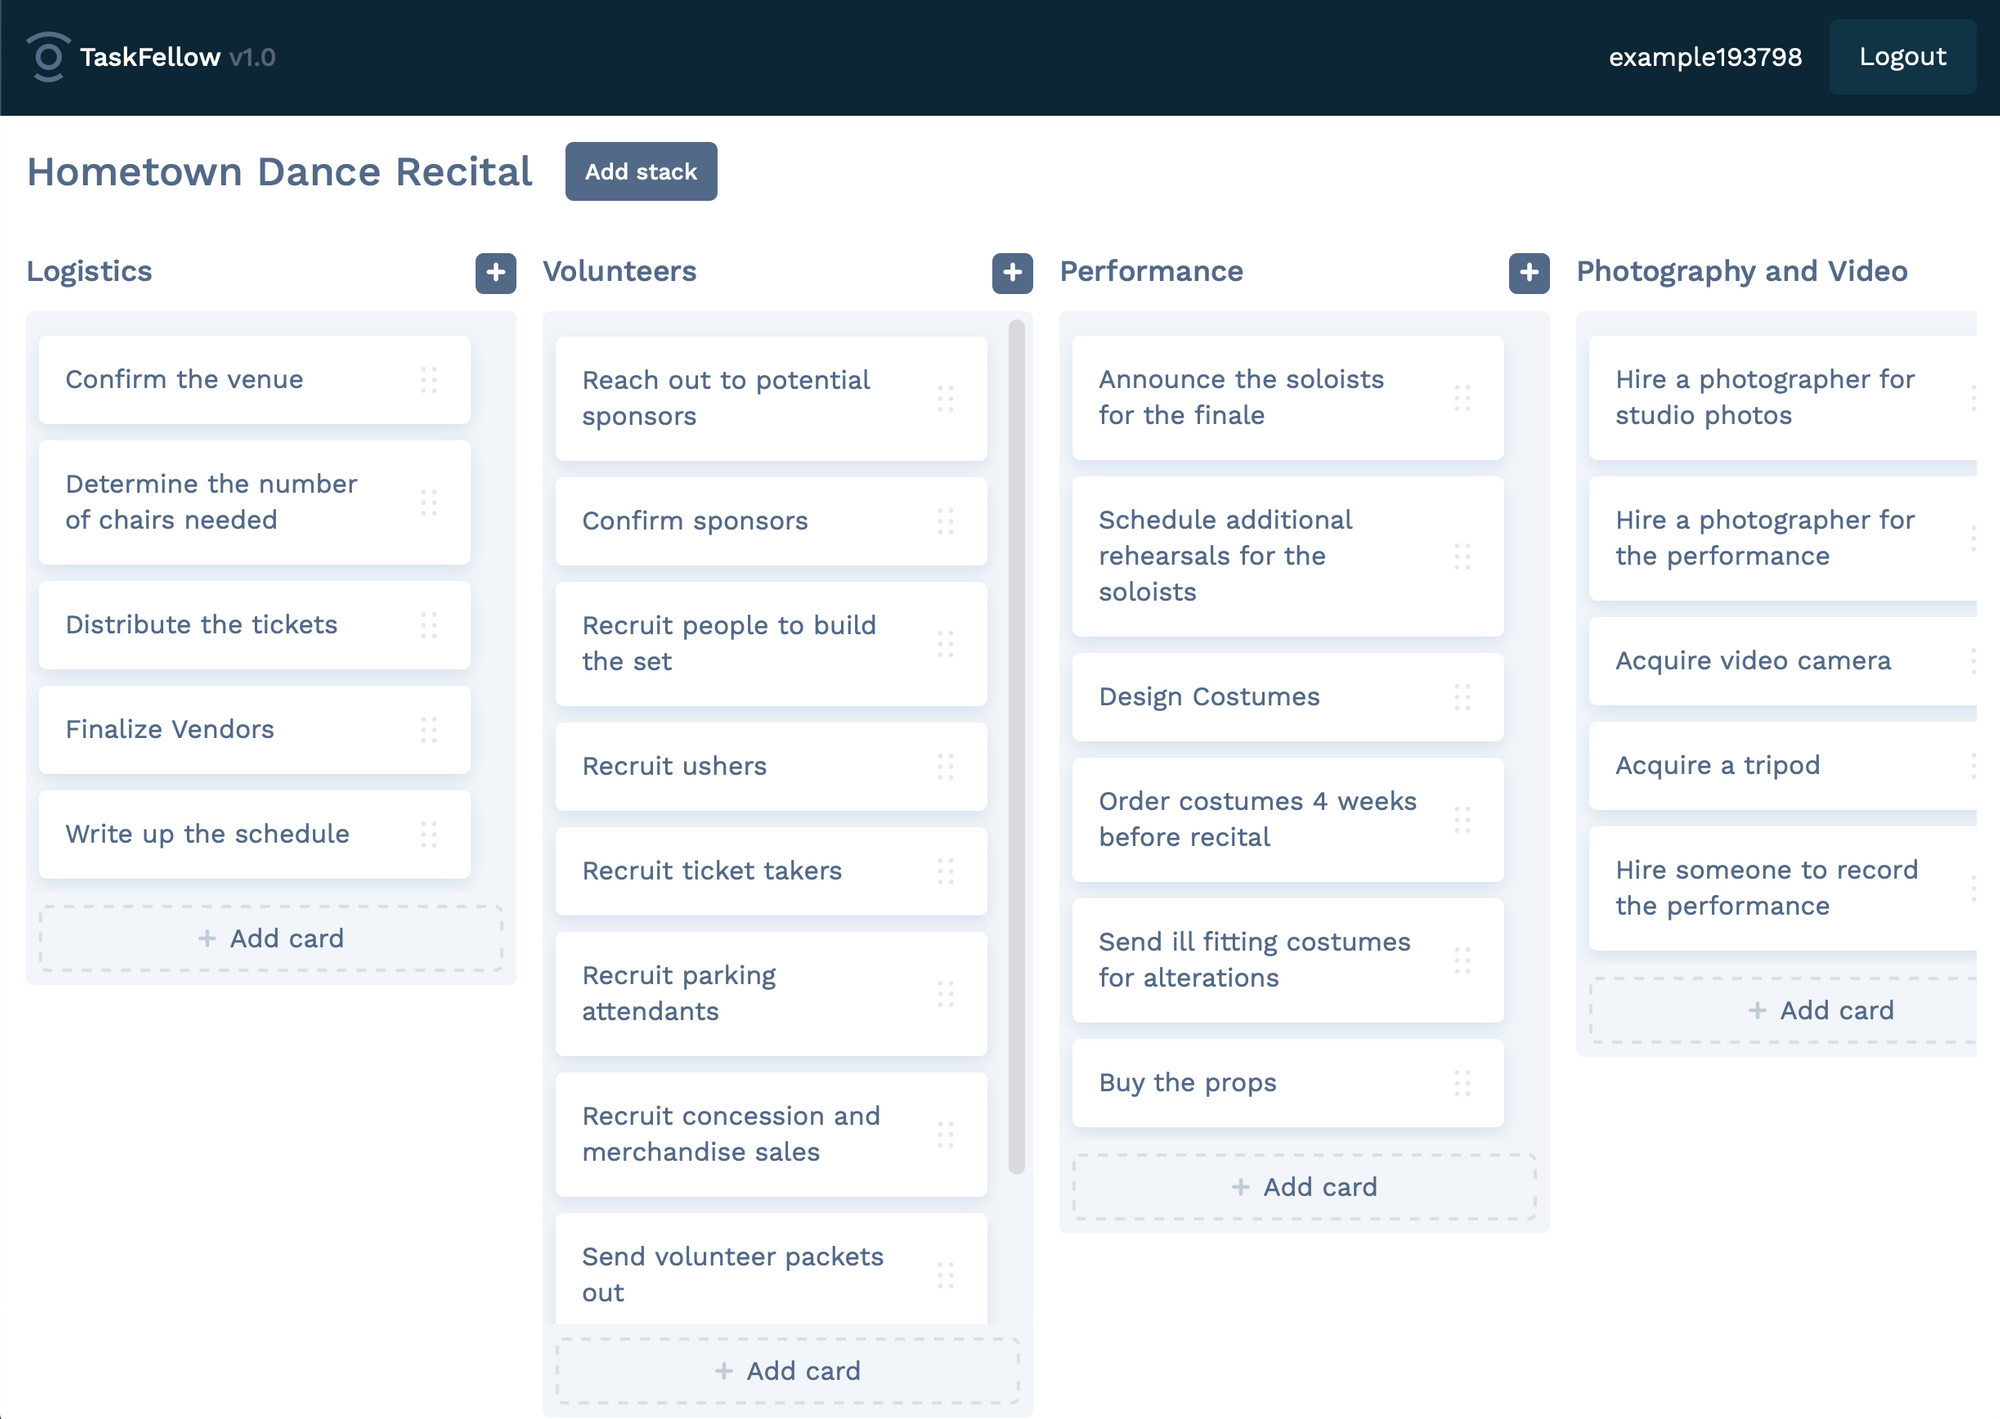
Try using the starter app to get a feel for how Remake apps work. Try adding, removing, and saving changes. Here are a few things I noticed in my brief tour.
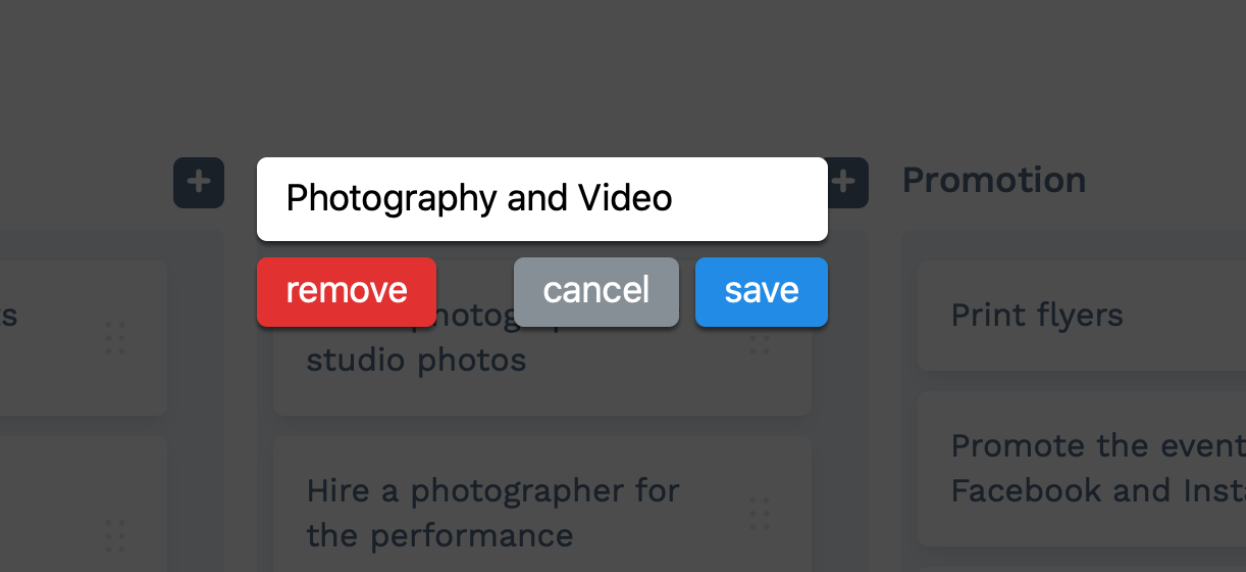
- You can click on titles of stacks or task items to edit the text inside.
- When you edit some text, a modal opens with buttons to save, cancel, or (sometimes) delete the item.
- You can drag-and-drop to reorder items in a list.
This is no Netflix, but there’s enough here to build many kinds of apps. Adding, removing, and changing things are the building blocks for everything from blogs and todo lists to personal dashboards.
Let’s see what code makes this app possible by visiting app/pages/app-index.hbs.
In the app-index.hbs file, which is a Handlebars template, we’ll find an HTML template sprinkled with attributes like object and edit:. You might have a guess as to what some of these attributes do, but for now, all we need to know is that these attributes are key to how Remake associates your app’s data with the template.
When you change the template and reload the page in your browser, you should see any changes in the template now reflected in the page. Try tweaking a few things before we explore the rest of Remake, like changing the “Add stack” button’s text.
A tour of Remake
Before diving into building an app with Remake, we should understand what goes where in a Remake project.
Static files in app/assets
Every web app needs to serve assets like images, JavaScript files, and CSS stylesheets. These are saved in app/assets under their respective folders.
Page templates in app/pages
If you’ve been following along thus far, you might have a good guess about what these files do — they’re templates for pages in your app.
For now, we only need to worry about app-index.hbs, but here are what the other pages do.
index.hbs: The “index page” of your app, when the user isn’t logged in (as opposed to app-index, for when the user is logged in).user/templates: Pages related to account management, like login/sign up pages and password reset.
Most of the time, you’ll be editing app-index.hbs. You can also add other pages next to app-index.hbs to create new static or dynamic (templated) pages for each user. This might be useful if your app has multiple pages or a sub-page for a particular piece of data, for example.
Root templates in app/layouts
You might have noticed that pages in app/pages don’t contain HTML boilerplate code like the page head. This is the responsibility of app/layouts/default.hbs, which defines the app “shell” into which all your pages are rendered by Remake.
User data in app/data and _remake-data
Remake stores user data in data/database/user-app-data as JSON files. For example, for my user account with the username “thesephist”, Remake will create a thesephist.json in which to store all my account data.
If you’re used to storing data in a relational database like Postgres, this tradeoff means a few things.
- Inspecting, editing, and debugging data is trivial, because you can just open the files to see how Remake sees your data.
- On the downside, storing data in files doesn't necessarily provide the same scalability and durability guarantees as a production-grade database.
For the kinds of apps I’m making for myself and a small number of users, most of the time, the advantages end up outweighing the costs. Under app/data, we can define a default user data file that every new user will inherit, when they make a new account.
Thinking in Remake
Remake started “clicking” for me when I learned that most of building a Remake app is finding a way to map a user’s data to parts of the user interface. I call this thinking in Remake.
When a user requests a page from a running Remake app, what actually happens?
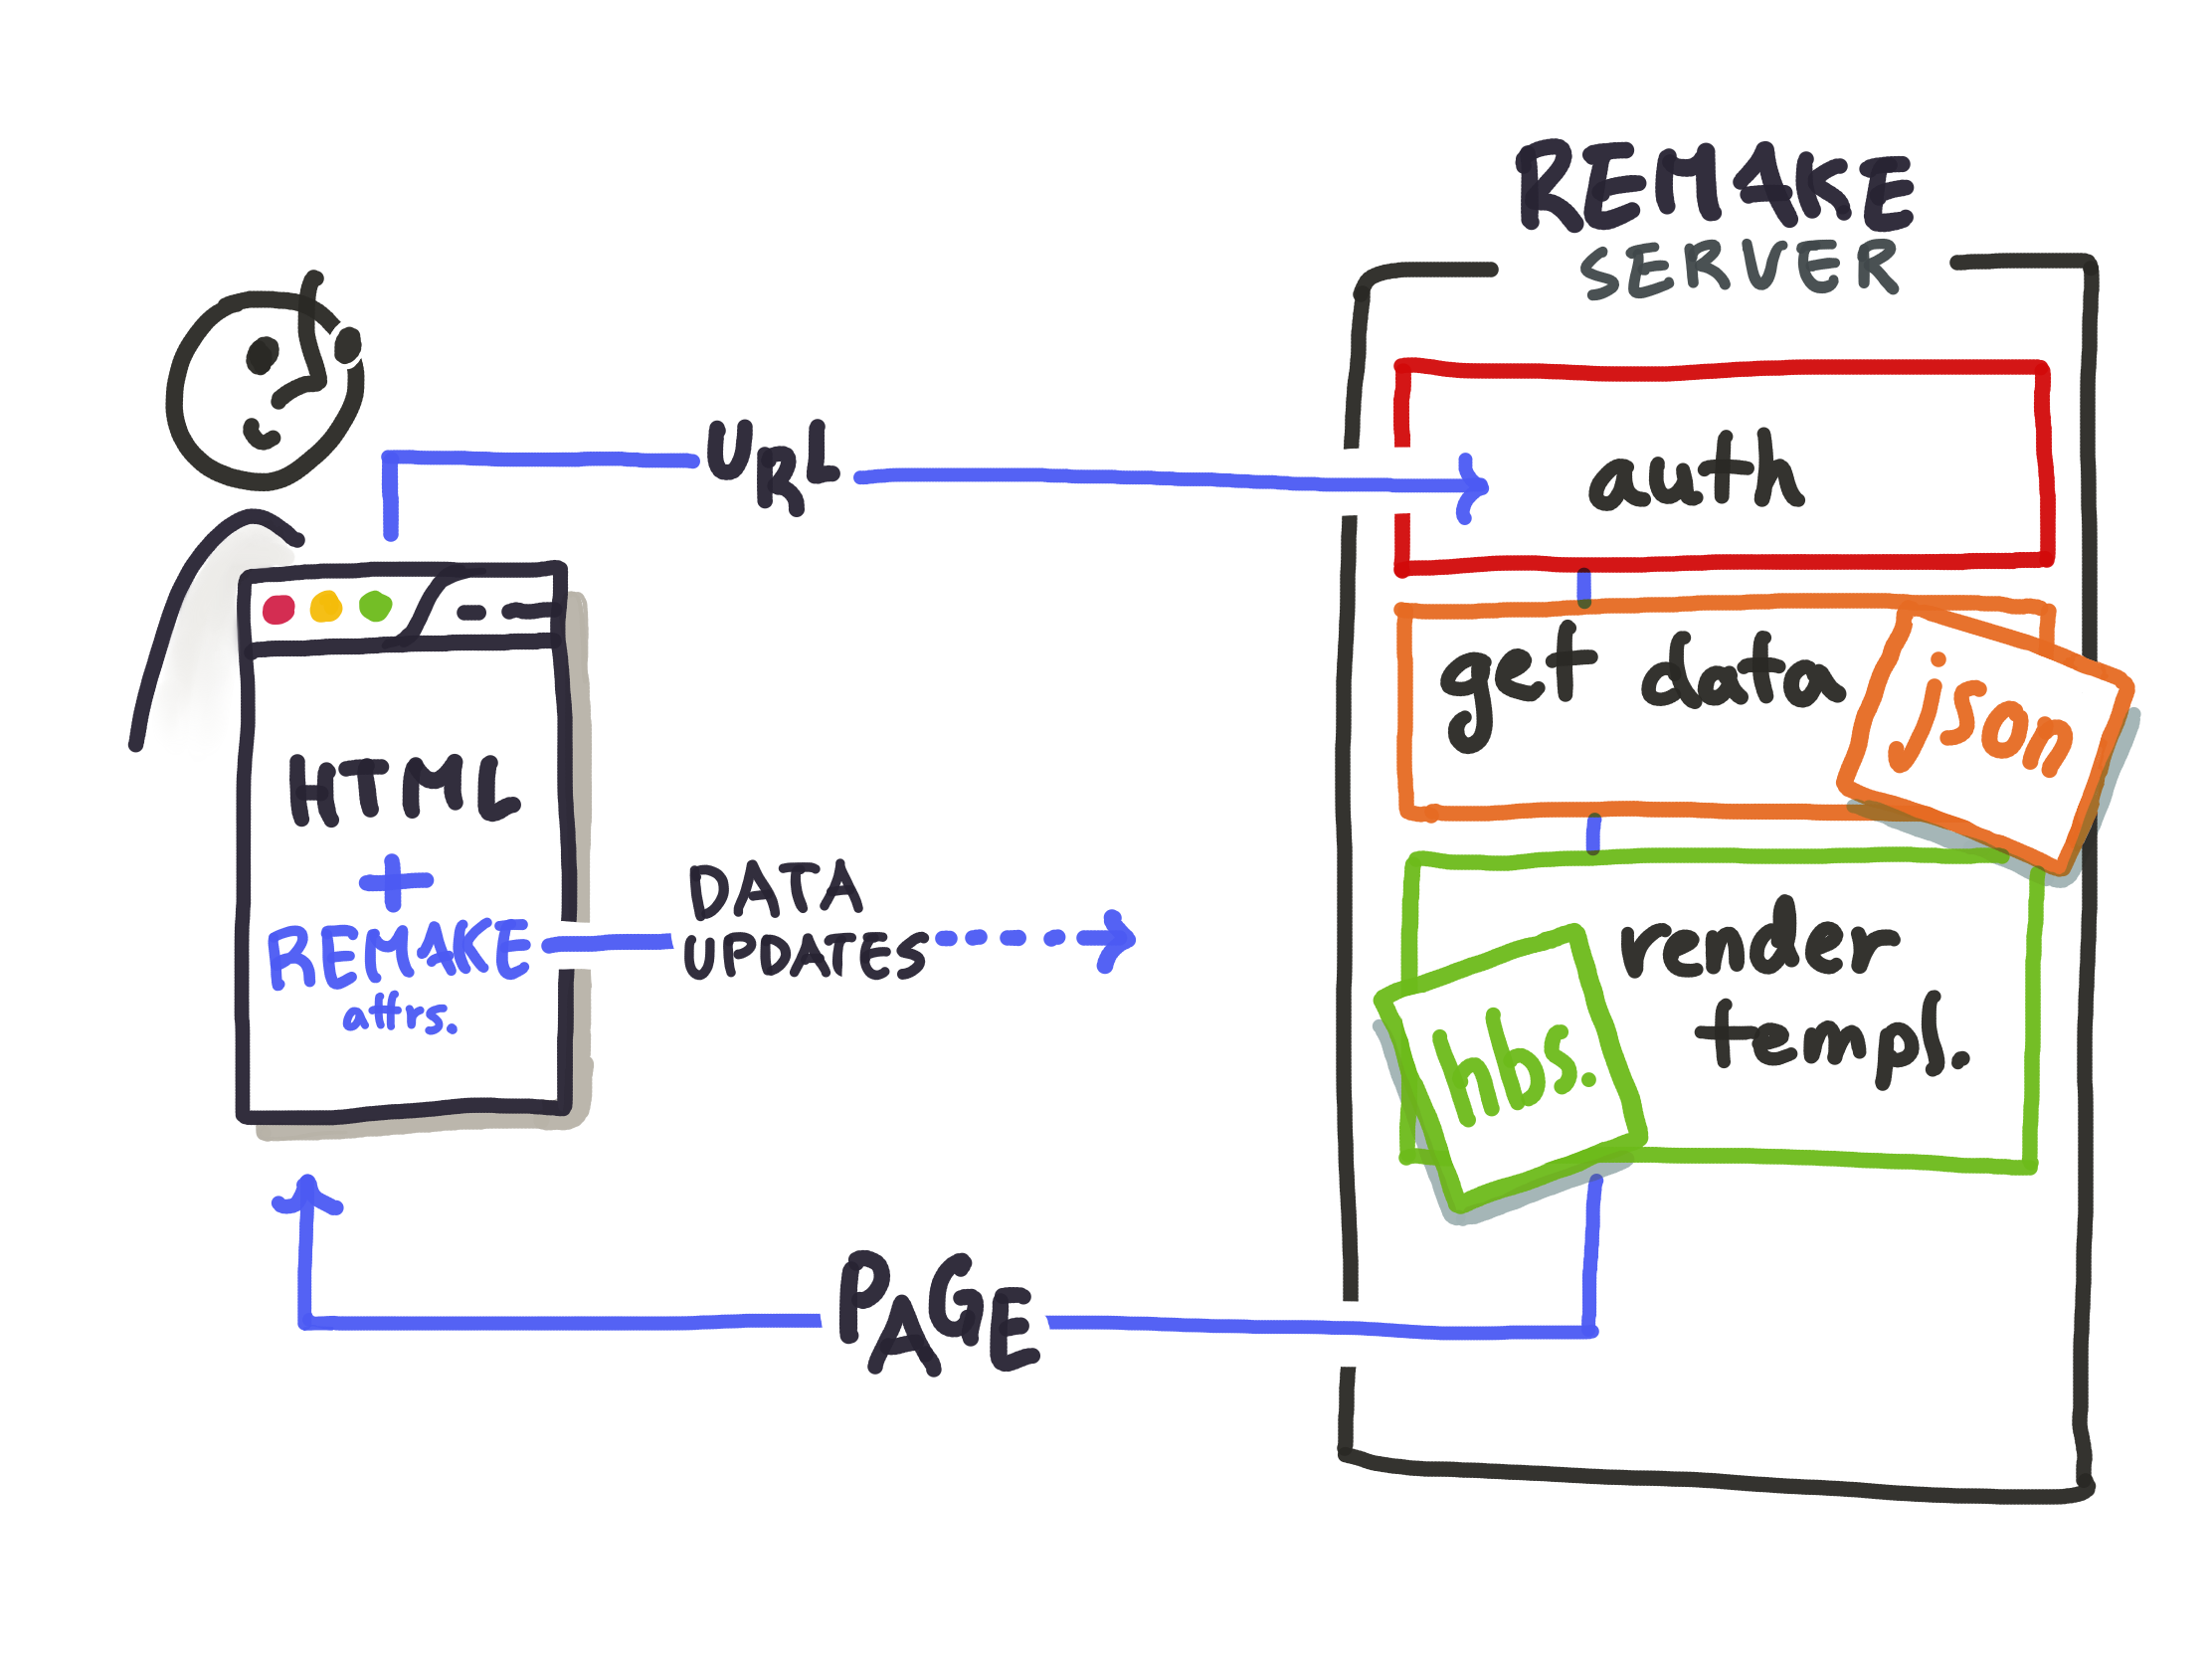
After authenticating the user, Remake…
- Fetches the data file (
{user-name}.json) for this user - Finds the Handlebars template for the requested page
- Renders the page template with data from the user’s data file, and sends it to the browser, along with small CSS and JavaScript bundles for Remake’s UI.
- The browser then loads the page, and Remake’s scripts crawls the page for any elements annotated with Remake’s attributes to understand how the UI maps back to the user’s data. When the user makes any edits to the page, the annotations tell Remake how to save those changes back to the backend.
A key piece of the puzzle to understand is that the template tells Remake how to render the page from the data; Remake attributes tell Remake how to save data back from the page’s UI.
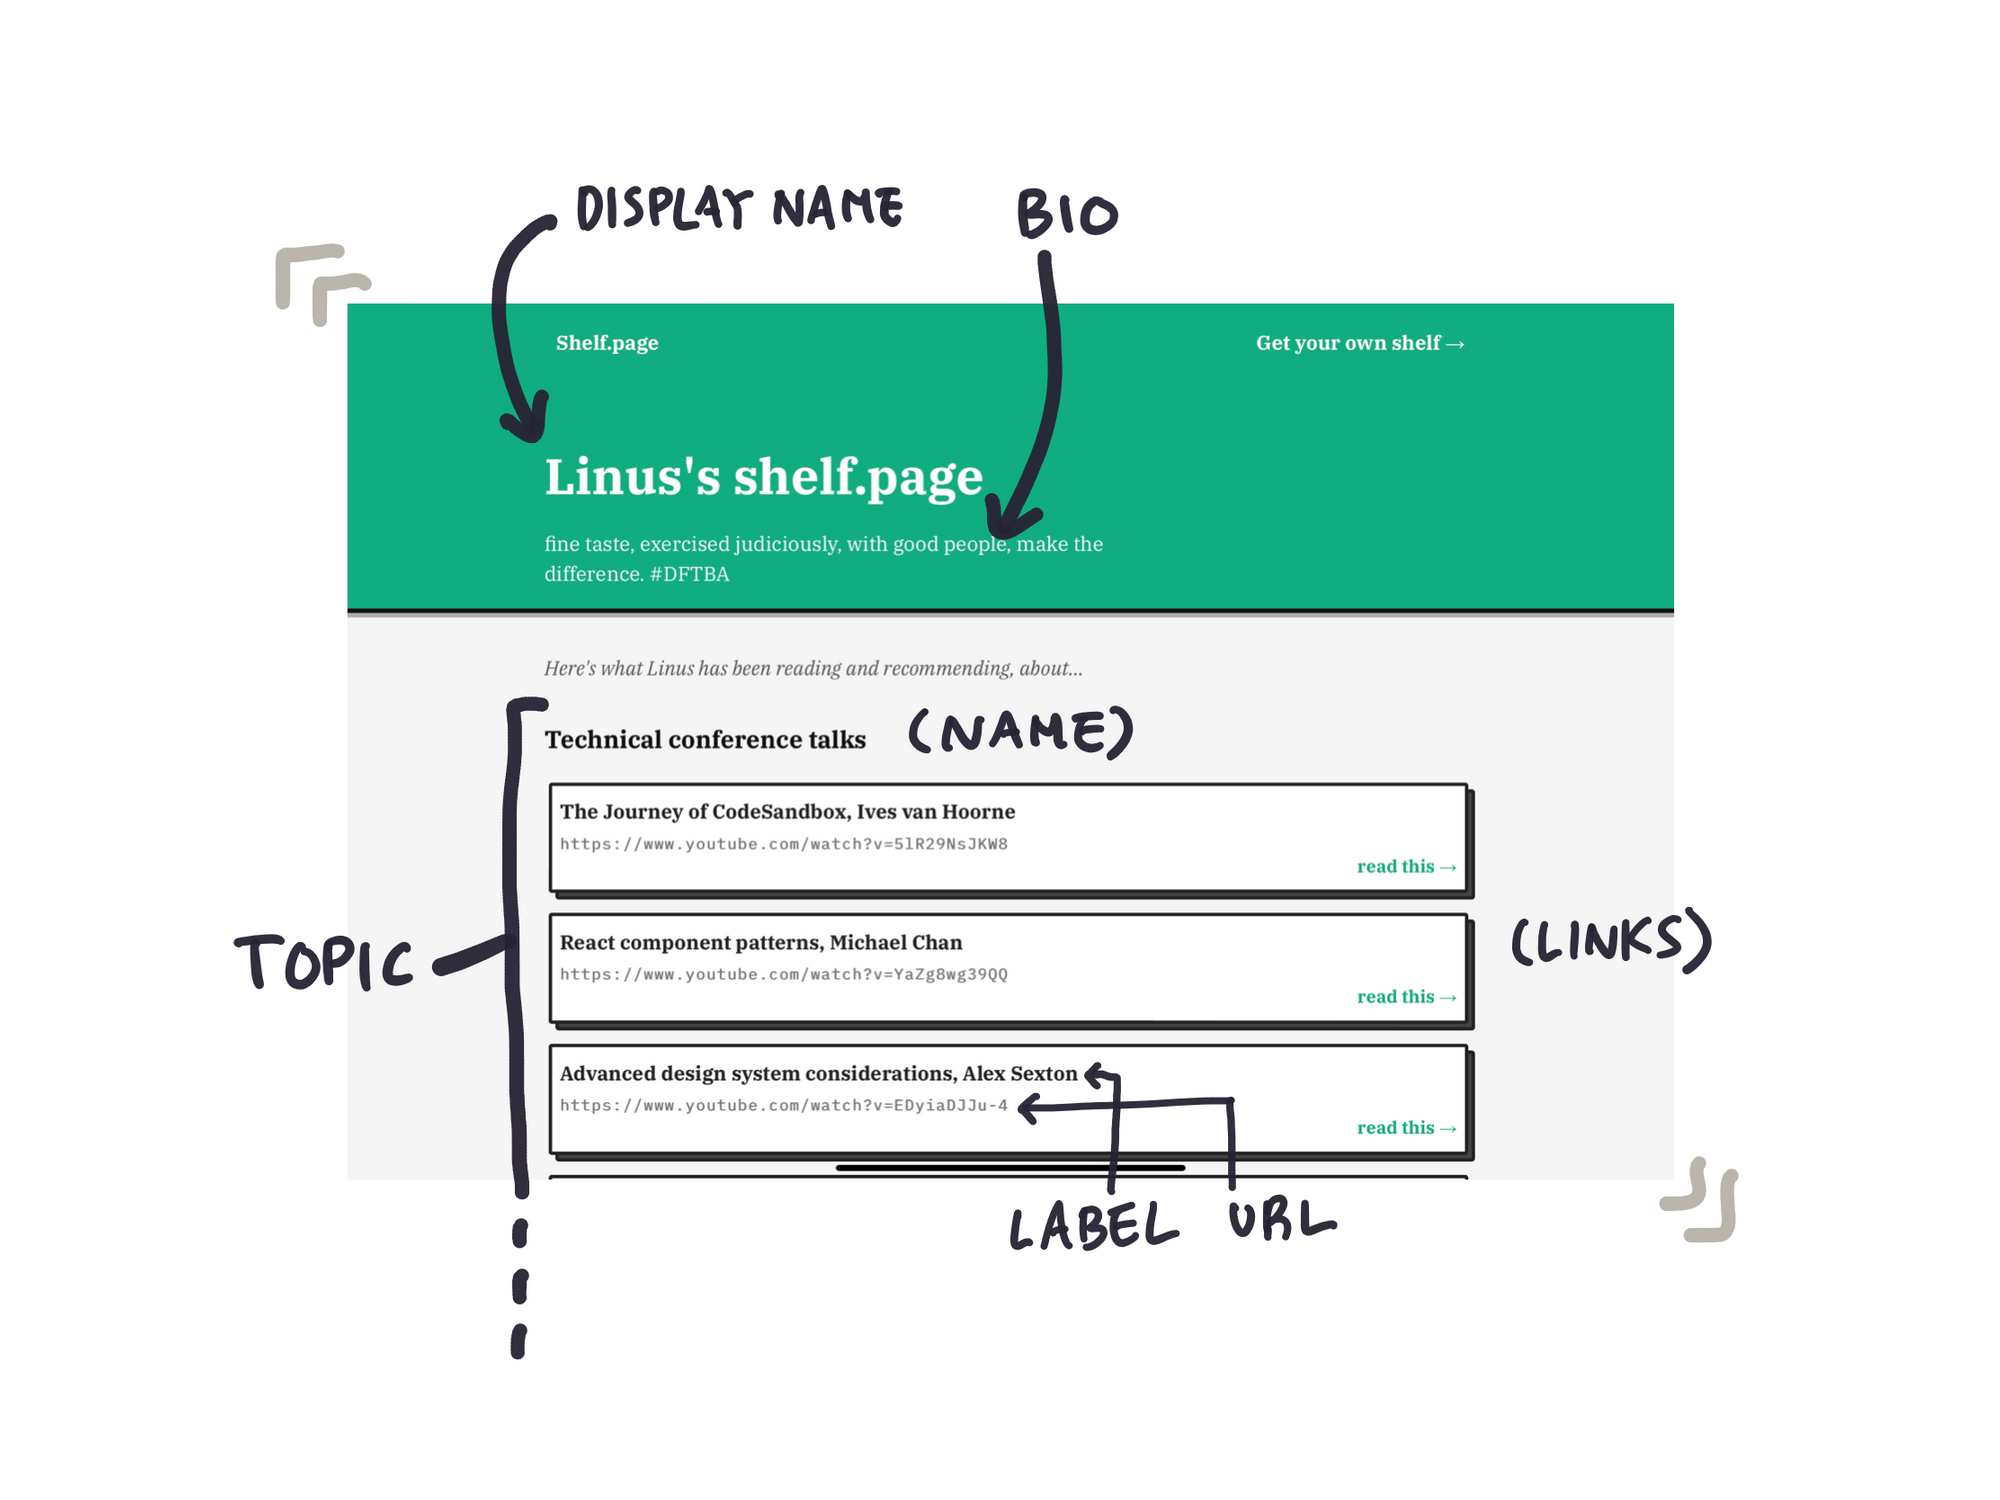
Because of this, a good first step to building a Remake app is to map out how your user’s data connects to your UI. For my Shelf.page app, I started with a schema like this:
{
  displayName: 'Linus',
  bio: 'Student, writer, fan of the 90s',
  topics: [{
    name: 'Tech',
    links: [
      {label: 'Remake', url: 'remaketheweb.com'},
      {label: 'Mozilla', url: 'mozilla.com'},
    ],
  }, {
    name: 'Community',
    links: [
      {label: 'Get Together', url: 'gettogether.world'},
    ],
  }],
}
A user has a display name and a short bio, and owns a list of topics. Each topic has a name for the topic, and a list of links under it with a label and a URL.
This shape of data maps really nicely to Shelf.page’s UI.
Once we’ve sketched this out, the work that remains is to express this in code! First, we write a Handlebars template for this page — this lets Remake render our page.
Second, we add Remake attributes to our template, so Remake can save any edits. This is the topic of our next section.
Remake attributes
Remake attributes have a lot of flexibility, but to get started, you’ll probably use them in a handful of useful combinations.
1) Editable text fields
Most commonly, you’ll want to make a text field editable. In our example, we might want the user to be able to edit the displayName property of our user data object. This takes three attributes.
<div
  object
  key:display-name="@innerText"
  edit:display-name:without-remove
>{{ display_name }}</div>
Here, we tell Remake we’re talking about a property on a JSON object (object), specifically the property display_name (key:display-name). Then we make this field editable, but not removable, with edit:display-name:without-remove.
2) Lists of things
The next common case is a list of things. For example, you might want to add a task onto a todo list. If we have data that looks like below…
{
  topics: [
    { name: ‘Computer science’ },
    { name: ‘Writing’ }
  ]
}
...and we want to show a list of editable topics, we’ll use these attributes.
<div
  array
  key="topics"
>
  {{#for topic in topics}}
    <section
      object
      key:name="@search"
    >
      <div
        target:name
        edit:name
      >{{ topic.name }}</div>
    </section>
  {{/for}}
</div>
There’s a lot going on here, so let’s break it down. As you follow along, consider how the hierarchy of the template matches the hierarchy of our data.
- At the top, we tell Remake we have an array (
array) of things at the property “topics” (key="topics"). Within this div, Remake will consider the array the “root” of our data. - We use Handlebars template notation to render an array of things {{#for topic…}}
- Each section element corresponds to a single item in the array of topics, which is an object in our data. We tell Remake this with
object.key:nametells Remake to “link” this element to a particular editable field, which will come in handy next. - Finally, we have an editable field for our topic names. We make this field editable and deletable with
edit:name. What happens when we delete this field? Deleting this field will delete the whole topic (the whole section element) because the topic is the closest JSON object that Remake could find in our data.
The target:name Remake attributes are the key to this pattern. It tells Remake to link one editable field to another part of our template.
3) Adding an item to a list
The last pattern to know is a button to add more items to a list. Given our template for a list from before, adding a button is straightforward.
<div array key="topics">
  {{#for topic in topics}}
    ...
  {{/for}}
</div>
<button new:topic>New topic</button>
Here, we added an element, outside of our loop with the Remake attribute new:topic, which tells Remake that clicking this button should add a topic item to our templated list of topics.
These patterns were enough for me to build Shelf.page, and will help you get started making Remake apps. But if you’re interested in the full breadth of attributes offered by Remake, you can check out Remake’s data attributes documentation: saving data, updating data, reacting to data.
Finishing touches and debugging tips
Once we have the basics of the app working with a template, there are a few finishing touches you might want to add. You might also run into some bugs you’re not sure how to start fixing. Here are a few tips I picked up shipping my first Remake project.
- JavaScript. Remake will not compile your JavaScript or CSS with Babel or SASS, but you can set those up yourself. Just make sure all your transpiled files end up in the
assets/directory. - Layouts. If you want to customize the “shell” of your app outside of the contents of page templates, you can update
app/layouts/default.hbsto add any stylesheets, script tags, or metadata you need. - Debugging data. If you suspect Remake isn’t saving your data the way you expect, a good place to check is
data/database/user-app-data, to see how Remake is saving your changes. If the data in the user JSON file isn’t shaped the way you expect, you could narrow down your search for the buggy parts of the template.
Deploy!
Once you have a working Remake app, deploying is fast and simple on Remake’s deployment platform. From the root of your project folder, simply run the command
npx remake deployand Remake will copy the right files up and spin up your service! If this is your first time deploying, Remake might ask you to create an account.
That’s it! You’ve deployed your Remake app, hassle-free. Try it out by going to your new domain and creating an account!
Do more with Remake
We’ve explored the basics of Remake in this post, but Remake is still growing and improving. For Remake the framework, a cleaner project layout is in the works, with nicer error messages and better documentation. For Remake the tool and deployment platform, you can expect new features like custom domain support in the future.
I’m really excited by how much faster I am at building simple apps when building with Remake, and I’m looking forward to how Remake grows in the future. If you, like me, have a few too many ideas for the hours in a day, consider building out your next hack on Remake.
Guest post written by Linus Lee. I'd highly recommend following him for more hacks, insights, and cool projects.
]]>You know how sometimes you have an idea for a web app and you think it will take 3 days to complete and then you're sitting there 3 years later about to release it?
Remake prevents that from happening.
It lets you release your full web app idea within your original timeline: 3 days.
Without Remake
Let's say your big idea is for a daily journal web app. How long would it take you to transform an HTML & CSS design of it into a fully-functional web app using a modern stack like React/Express/PostgreSQL?
Let's start with the first component: the title of a journal entry, which will be displayed at the top of every journal page.
- Split its HTML into a separate, named component
- Add some internal state to that component
- Pass some demo state down from the root component (or a data store)
- Set up some methods on the component that can change its state and make it interactive
- Write some code to connect your component's visual state to its internal state
- Style your component in all its possible states (including an editable state)
- Write some code to connect user events to the methods that can change the component's internal state
- Use a mock endpoint to load data into the component (or data store)
And that's only half the battle: the front-end. You still have the backend.
Here's what the backend would require:
- Create an endpoint to save and validate the component's data
- Hook up the save method to the save endpoint and pass up the data
- Create an endpoint to get the component's data
- Load the data from the get endpoint into the component
- Create an endpoint to delete/clear the data for the component
- Hook up the delete method to the delete endpoint
- If you haven't already: build out user accounts for the 100th time and make extra sure they're secure
- Add permissions rules to the endpoints to make sure the data's not editable by users who don't own it
Ok, so that was at least 4 hours of work... but now you're done!
Except... that's only for a single component.
Now you have to go back and do all sixteen steps again for just about every other component in your app...
Even for a simple app, just the process of hooking things up — not making things look nice or behave as expected or fixing inevitable bugs — can take weeks, if not months!
Modern web development is a time sink
And — don't forget — since you're working with a modern stack and building a web app from scratch, you're bound to run into even more issues:
- Passing state up and down the component tree can get complicated. You'll probably want to add a data store at some point.
- Rendering data alongside other code and plugins can lead to weird interactions and race conditions.
- You need to install an asset bundler, configure it correctly, and make sure you're using all the best practices.
- There might be some visual or usability issues caused by rendering on the front-end that require a deeper dive to understand.
- You'll probably go down a few rabbit holes researching problems you've never seen before.
- Integrating 3rd party libraries, even for simple things like routing, can require reading pages of documentation sprinkled across the internet.
- Keeping all the modern 3rd party libraries up to date and your bundle size low can be a huge hassle.
These things seem small individually, but over time they pile up and sap your time and motivation. Before you know it, that small bug that was supposed to take an hour is still sitting in your backlog a week later.
That's a lot of time and energy down the drain for a project that seemed so simple at first.
What if there was a better way?
What if, when someone saw your HTML & CSS design, they could imagine exactly how it would work — and there was a framework that saw it the same way?
Meet Remake
With Remake's straightforward syntax designed specifically for building web apps, things are simple.

In order to build an entire web app — not just a single component — with Remake, this is all you need to do:
- Add a few custom attributes to all the elements in your app that have data inside them, so Remake knows how to save your app's data
- Add an extra attribute to any element that's editable
- Create the application's initial state for new users by defining it in a JSON file (optional)
- (Skip this step) You don't worry about styling editable states (unless you want to) because Remake comes with built-in components for editing data
- If you want your app to have multiple pages or you want to use a component across multiple pages, just move that page/component HTML into separate template
And that's it! It's really that simple to build a full web app! 🚀
Build real web apps faster
What you don't need to think about when using Remake:
- Data saving, deleting, editing — because Remake auto-saves when data changes and has built-in editing capabilities.
- User accounts and serving static assets — already taken care of for you.
- Creating separate components — do it only when you want to.
- Lifecycle methods — Remake is server-rendered, so the HTML that's rendered is final and you can do whatever you want with it.
- Coding JavaScript 🤯 — your web app's functionality can be implemented with Remake's custom attributes.
- Bugs caused by re-implementing native browser features — Remake web apps are server-rendered with a little magic layered on top (they're not SPAs), so: 1) your pages will render even when JavaScript is disabled, 2) they'll be SEO-friendly, 3) they'll take advantage of native browser features like remembering scroll position and the back button.
And, to top it off, you'll be less likely to create bugs of your own because Remake has created a simpler model for what a web app is — making it much easier to think about.
To truly understand what makes Remake so awesome, you'll have to try it out for yourself. You can learn it in a few hours and deploy a web app today!
Finishing your app is more important than perfection
Next time you're glued to the computer at 4am working on some random bug with your build process, take a step back and think about who you're doing this for.
Will your future users really care if your build process works? Or if your database has the right schema?
Or do they just want to try out your idea?
Remake is the perfect tool for getting imperfect ideas out of your head and into the world, so you can see if they're any good. Save your engineering expertise for after you've found some users for your product.
]]>If you’re more interested in learning how to use the framework and what you can do with it, the Intro to Remake series
]]>Are you curious about why Remake was created, what its mission is, and why its founder spends nights and weekends working on it? Read on!
If you’re more interested in learning how to use the framework and what you can do with it, the Intro to Remake series is a better place to start.
Let’s jump right into the interview with David Miranda, the founder of Remake!
“How would you describe Remake to someone?”
That’s a difficult question. It depends on who they are.
If they’re a full-stack developer, I’d probably tell them to use another framework. They’re used to having a ton of flexibility and Remake isn’t good for that. Remake’s focus is on simplicity and speed to market.
If they’re a no-code enthusiast, I’d probably tell them to go with Bubble or Glide Apps to build their app. They’re used to interacting using visual builders to build things — and Remake won’t give them that. Instead, Remake lets you create that no-code experience for other people.
However, for better fits, I’d have a different answer 😁
- If they’re a front-end developer, I’d say: “I hate the backend too and that’s why I created Remake. Come join me in my mission to destroy backend programming.”
- If they’re an entrepreneur/indie hacker and love to launch new products all the time, I’d tell them: “Remake is the fastest way to build a web app that has a custom design and can serve as many customers as you want. Switch to us to launch your products even faster.”
- And, finally, if they’re a designer, I’d tell them: “Are you tired of arguing with developers about what’s possible to build or not? With Remake, you can just build it yourself. All you need to know is HTML and CSS and you can launch a working product!
“What’s your vision for how people should use Remake?”
My dream for Remake is that it will help more people launch successful startups.
The problem is, right now, there’s too many “right ways” to do web development — and they’re all hard. They suck away your time until you’re only spending 10% on your actual product.
I want Remake to be the framework that people reach for when they just want to build something.
It will never be able to do everything, but if it can help someone get an extra 3-4 ideas out into the world every year, I’d be happy.

“Is Remake mostly for prototyping?”
No.
Prototypes are meant to test the look and feel of an application without actually building one — but they don’t help you test the experience of actually using a full web app.
Remake lets you build a real web app that has real user accounts and a database — and the web apps you build with it actually work.
It lets you test full experiences.
Remake is meant to be replaced after a year or two, but only after you’ve gotten some traction with your product and figured out if it’s something people want.
“When would someone need to switch to a more mature framework?”
If you’re building a web app that lets people login and edit the contents of a website then Remake will be a perfect fit for a long time.
Remake will soon be adding first-class support for anonymous form submissions, filtering/searching data, and collaborating on editing web pages.
If these features are enough for you, you won’t need to switch away from Remake ever.
However, if you need advanced social features or real-time updates across users, you’ll probably need to switch to another framework (or build it yourself by customizing Remake’s backend).
However, it won’t be hard to switch, even if you need to. Remake is 90% just the normal HTML and CSS you’d have to write anyway, no matter which framework you’re using, so removing it and switching to something else is as simple as removing a few custom attributes from your HTML.
“What inspired you to create Remake?”
“If I can build a website, I should be able to build a web app.”
This thought keeps me up at night.
I think it’s absurd that web technology has gotten so complex that it’s virtually impossible for a beginner to build a working web app in under a year.
Over and over again, I’ve come up with a design, coded it in HTML and CSS, and felt like I was 99% done even though I was only really 30% done.
It was disheartening to have to go through the painstaking process of building a backend over and over again — when I knew that I was reinventing the wheel every time.
I just kept thinking: “building a backend should be a solved problem by now.”
And that’s why I made Remake: I wanted people to be able to build things just for fun, working just on the front-end and focusing just on the interface people will see, but also to be able to release a fully working product.
“Why did you create a new framework when there are already so many?”
Remake is a Meta CMS. There’s no other good way to explain it.
With a normal CMS like Wordpress or Webflow, you can deploy a single editable website for a single client. In order to serve multiple clients, you’ll have to deploy another copy of the CMS.
A Meta CMS, on the other hand, lets you serve multiple customers with a single template. You build it once, but an infinite number of customers can login and edit their own copy of it.
I searched for months looking for a Meta CMS, but came up with nothing.
The business model made sense to me though:
- A developer creates the front end
- The Meta CMS handles the backend and user accounts
- The developer gets to run a full business with multiple customers instead of just one
- The Meta CMS helps the customer scale their business instead of just helping them serve one customer at a time
No one was doing this. I found it weird that there was this gap in the market.
So, I decided to build my own Meta CMS. Not on purpose, at first... I was just experimenting. I started out by just brainstorming some of the simplest ways to achieve this.
My first idea for Remake was:
- Let users edit HTML on the front-end
- Save the entire HTML page to the backend (to the current user’s account)
I still think this is a genius idea 😁
Since most JS plugins just let you modify front-end HTML, why not just save the resulting HTML to the current user’s account in a database and call it a day? That’s basically a web app — an editable website. (You could even do some funky things with using CSS selectors in place of SQL statements to sync data between pages, but that’s another story).
However, I soon switched over to the current model of Remake (tagging elements with labels and converting HTML into JSON), which made it a lot easier to save data, label it, and share it across pages.
At the time, I thought I was just building a small tool for RequestCreative, but the technology turned out to be so fun and fast to work with that I wanted to bring it to a wider audience.
I started live streaming the development of a frontend framework called Remake.js in 2019, which eventually developed into the full stack framework that Remake is today.
“Are there any misconceptions about Remake you’d like to correct?”
- Remake isn’t a no-code tool. It lets you build no-code tools for other people.
- Remake isn’t a front-end framework. It’s a full-stack framework that comes with user accounts and a database — and it’s actually server-rendered.
- Remake isn’t a CMS. It lets you add CMS-like capabilities to a static HTML/CSS template — and distribute an editable website to an infinite number of customers, not just one.
“What do you envision this framework becoming?”
Making a web app should be as simple as publishing a blog post.
My dream would be that Remake would be part of the browser. There would be a “New Web App” button right under the “New Tab” button in the browser’s main menu.
This would make it easy for beginners to get started with web development.
As a kid, you could start playing around with making a web app and have something figured out in maybe a few hours. Within a day or two of experimenting as a total beginner, you could have a working web app that you made yourself.
You could share it with friends and see what they think of it. Before long, you might have taught your cousin how to make web apps too. And you could build one for your uncle, aunt, or mother.
The ability to make a website is one thing, but the power to build something interactive that other people can contribute to (a web app) is an entirely different experience. It’s magical to see someone use something you made and get value from using it. I want to bring that experience to as many people as I can.
]]>Have you ever wondered: “What if clicking on a hyperlink could transport me — not just the screen in front of me — to a new location?”
That’s what the founders of Uber wondered. So, they transformed an ordinary link into a request for a ride.
This is called “hacking hypertext”.
Imagine, a link—a button, a menu, a search result—being able to accomplish something in the real world with a single click.
Google is a great example of this. They hacked hypertext in two ways: 1) They realized a hyperlink to a page meant that page is more valuable and 2) They gave everyone access to the most valuable links with the click of a Search button.
Facebook took hyperlinks to the next level by making them represent people and their relationships. Events, messages, profile pages, relationship statuses — all available with a click.
Who else has hacked hypertext?
- Amazon has 1-Click ordering that makes products show up at your door
- Airbnb lets you rent apartments around the world with a click
- Netflix makes thousands of tv shows and movies accessible with a single click
These companies transform the good ol’ hyperlink into something incredibly powerful.
For most of us, though, links are still just plain, boring links.
As an ordinary person on the internet, I can’t create a link out of thin air that will show a list of my upcoming events or let someone rent my apartment — I rely on Facebook and Airbnb to create these kinds of links.
So, the question is: why isn’t hypertext more powerful by default?
The answer is: it’s wildly expensive to transform an ordinary hyperlink into something more.
Big companies like Google and Facebook spend billions of dollars a year building the infrastructure and hiring the talent necessary to support their hypertext hacks.
Usually, the most an ordinary citizen of the internet can do is use a hyperlink to link to their social media profile or personal website.
But... what if someone decided to democratize the incredible power these big companies have to hack hypertext?
What if anyone could hack hypertext?
More and more companies are buying into the “Low-Code” movement. Companies like Stripe, Webflow, and Shopify are making it easier to create online businesses. And companies like Airtable, Bubble, and Glide are making it possible for ordinary people to build powerful experiences using a set of hypertext hacks they invented.
But the foundation is still lacking. Hypertext itself hasn’t changed that much in the past three decades. It’s still, by default, pretty weak. It’s meant to create links between pages, not links to real-world actions.
I believe there’s a stage after “Low-Code”, a kind of hypertext 2.0. Maybe it comes with virtual reality, or cryptocurrency — or maybe it’s born when someone creates a new type of web browser. I don’t know. But, when it comes, it’s going to let anyone have the power to reshape the real world with a good ol’ hyperlink.
]]>
Web applications are notoriously complex to build.
What if they weren't? What if web apps were so simple and easy to build, you wouldn't feel guilty about creating one from scratch and then throwing it away the next day?
Remake's power comes from letting you build just these kinds of web apps. We call them disposable web apps.

Disposable web apps are the opposite of everything wrong with web development today. They don't require a huge investment in development, so you don't need to plan ahead so much by spending time designing, prototyping, and researching.
- You design as little as possible.
- You prototype by building a full product (quickly).
- You research by launching.
- You improve by getting real feedback on a real product.
Disposable web apps don't come with the normal headache associated with starting a big project — you can always just boot up a new web app in a few hours.
They give you the freedom to spend more time experimenting, playing, and talking with real users — and that's the real recipe for building something people want.
Remake's Capabilities
Remake lets you build web page builders.
Web page builders are websites that your visitors can modify. They can add items, remove items, upload photos, etc. And each user gets their own copy of the website that they can edit on their own.
Remake's ideal use case isn't making just one website for one client. Tools like Wordpress and Webflow can help you with that. Remake's power comes from using a single website template as the basis for a multi-user application, where each user can modify their own copy of the website and their copy is theirs alone.
Remake is a great fit for any website:
- Where 90% of the value of your website comes from the visual representation of its data and letting users directly edit that data
- If you want to build a website just once, but have each of your users get a unique copy of it that they can edit
Remake lets you have:
- Complete control over the design of your pages 🌈
- As many pages (and nested pages) as you want 📚
- As much data as you want on a single page 📊
- As many people as you want to sign up and edit your app 👨👩👧👦
You can build a web app with file uploading, custom style controls, and blog post editing all on the same page if you want — or put each control on a nested page. It's totally up to you!
Projects you can build with Remake
Remake is really powerful and fast to build with, but it can't build every type of application. In the following lists, you'll fine the types of applications Remake was designed to help you build.
Standard web page builders:
- Resume/CV builder
- Portfolio builder
- Business website builder
- Directory builder
- Changelog builder
- Product roadmap builder
- Multi-step form builder
- Project proposal builder
Single-player games and personal productivity tools:
- Kanban board
- Habit tracker
- Personal CRM
- Personal journal
- Personal task manager
- Garden planner
- Choose-your-own-ending game
- Multi-step quiz
The first production web app built with Remake was RequestCreative. It's an easy-to-setup storefront for freelance creators. You can see some of the advanced features that Remake supports by visiting this website.
→ Full list of Remake app ideas (and the apps you shouldn't use Remake for)
Remake's Limitations
Remake doesn't do so well with:
- Processing lots of data on the backend (calculations, data transformations)
- Data shared across users
- Social features (liking, commenting, following)
- Displaying real-time data
So, Remake is not a good fit for your web app if:
- A large part of its value comes from how it processes or transforms data
- You need to let multiple users edit the same data
- You need to display data from multiple users on the same page
This means you shouldn't use Remake to build the next big social network, chatbot, analytics platform, multiplayer game, or collaborative document editor.
If these limitations are okay with you, then Remake can turn HTML into one of the most powerful languages for building web apps that you've ever seen.
If these limitations aren't okay with you, sign up for our newsletter. Some of them might change soon. You can also let us know which features we should build next on our public roadmap.
→ Full list of Remake app ideas (and the apps you shouldn't use Remake for)
Should you use Remake?
You should use Remake if your customers want to build websites — and you want to launch really fast.
- If you run an agency that makes websites for dentists and you want to transform your dentist website template into a web app product that each of them can use, you should use Remake.
- If you want to build a dashboard to store and organize your thoughts and you think other people will benefit from having a similar personal dashboard, you should use Remake.
- If you want to build and launch a web app every few weeks, there's no better low code framework for doing so than Remake.
Use Remake if you know HTML & CSS really well — and you don't want to deal with setting up a backend.
What will you make today? ✨🧙♂️
"Intro to Remake, Part 3" is coming soon. Sign up to hear about it!
]]>
If you've developed products before, you know there are two huge traps you can get stuck in because building web apps the traditional way is so damn hard:
- Do a ton of research, come up with ideas, but never actually build anything. You never feel quite ready to commit because you’re not sure it’s “the right idea”.
- Start building a really small piece of a really big idea, hoping that when you finally release the entire product years from now, it will “change everything overnight”, but never feel ready to show it to the world because “it’s not quite done yet”.
Remake solves this predicament by pulling it out at the root: it makes building an app so damn easy that all your reasons for not shipping it disappear.

Remake is a new type of framework whose goal is to make building web apps feel more like doing a quick sketch and less like painting a masterpiece.
What if you could use regular HTML to build a dynamic, editable website in about an hour? Well, we’ve got news for you — Remake makes this a reality.
Remake wants to help you, above all else: Find product/market fit by launching early and often.
Our goal is to speed up this process:
- Get a working product into people's hands (Remake)
- Get the feedback you need
- Improve it until it’s incredibly valuable (Remake)
So, what is Remake, really?
Well, have you ever created a really nice design and wished people could just start using it? Remake lets you do that. Remake provides a simplified structure for what a web app can be, allowing you to take big shortcuts and speed up your workflow.
Remake works by redefining what HTML can do. It transforms HTML into a language that's purpose-built for making interactive websites. Simply put, Remake makes it possible to build a web app entirely in your front-end code.
With Remake, you can transform an HTML + CSS template into a fully-functional web app in minutes.
Remake assumes that most of your app’s data will be:
- Displayed directly on the page (as text, CSS styles, images, or uploaded files)
- Will be editable by the page's owner — and only by them
Remake features powerful, built-in components that will allow your users to create, edit, and delete data from the page, while also creating a direct link between your HTML’s state and your back-end state so it can keep them in sync.
In most apps, HTML is already used for organizing and displaying data. The only thing it’s missing (before it can be used for building dynamic web applications) is the ability to save data in a separate location so the page can be re-rendered later.
A Language for Building Web Apps
Remake adds what's missing from HTML to transform it into a simple, declarative, and powerful language for building web apps.
So, now you can:
- Use HTML attributes to attach data to the page
- Sync that data to your back-end automatically
- Use the structure of the data on the front-end in your back-end
And your users will be happy with your Remake web app as well!
- It comes, out-of-the-box, with components for easily editing data
- It has API endpoints that it calls automatically for you (for saving/creating/editing/deleting data)
- It even supports user accounts and file-based routing so you can just focus on building something that works!
Build a Photo Blog in Only a Few Minutes!
With all of these powerful features, it only takes a few minutes to create a delightfully simple web app out of a few HTML + CSS files. With Remake, you can get back to shipping and everything else will be taken care of for you!
What will you make today? ✨🧙♂️
Continue reading: Intro to Remake, Part 2: What You Can and Can't Build
]]>It's amazing how many tools there are that get you from 0% to 100% in building a business, building a community, or changing someone's life for the better.
I want to explore what those tools are and how they can help you. My goal is to be unbiased and present only the best. I've carefully researched each one.
What are no-code and low-code tools?
Any tool that saves you hours a day in any of the following categories counts as a no-code/low-code tool in my book:
- Hosting (deployment, scaling, security)
- Backend (data collection, data processing, connecting to APIs, data storage)
- User Accounts & Payments (user management, memberships, subscriptions)
- Front-end (UI components, state management, app frameworks)
- Marketing (landing pages, email lists, analytics, blogging platforms)
- Customer Engagement (gathering feedback, usability testing, roadmaps)
- Product Iteration (incorporating research, building new features quickly)
Criteria for inclusion in this list
To cut down on the amount of tools listed here, I have some strict criteria:
- Designed for indie makers (takes max 3 hrs to set up)
- Priced for indie makers ($10-$50 per month)
- Extremely well designed (does what you tell it to)
- Highly innovative (10x better results than average)
- Well documented (reliable and easy to navigate)
- Actively maintained (has received an update recently)
Also, each tool is rated with the following statuses:
- 🧐 I want to try this
- 🤩 I actively use and love this
- 🥰 I've heard great things about it
- 🤓 Created by an indie maker
- 🤯 WTF! THIS IS REVOLUTIONARY!
The No-Code and Low-Code Tools 👇
Mobile App Generator
Tools that let you build apps that work on smartphones, very quickly.
- Adalo — 🧐🥰 Exports a real mobile app. Has a database API. Allows you to trigger native smartphone notifications.
- Glide — 🤩🥰 Converts a spreadsheet into a responsive web app in minutes. Great for simple projects. Does not export a real mobile app.
- DraftBit — 🤯 Has great UI and animations. Doesn't support exporting a real mobile app (but plans to). Doesn't support a custom backend (but plans to).
- Thunkable — 🧐 Aimed at beginners, but still fully-featured. Exports a real mobile app. Uses a snap-code-into-place UI like Scratch.
Simple Backend as a Service
These offerings provide a really simple service, but make it easy to transform an otherwise static site into a dynamic one
- EasyDB — 🤩🤓 The easiest way to add a database to your web app. The database expires after some time unless you pay for it.
- Cloud Local Storage — 🤩🤓🤯 A service that lets you have a database in the cloud using the browser's familiar localStorage API.
- Userbase — 🧐🤓 Quick and easy way to get a real application up and running, with user accounts and a database included!
- JSON Box — 🧐🤓 A quick and easy way to add dynamic data to your website or app. Great for prototyping. Has some limits on data size.
Authentication as a Service
Let users sign up for your service and get access to individualized data.
- Magic — 🥰🤓 With a few lines of code, your app can support a variety of passwordless login methods.
- Auth0 — 🧐 Allow users to sign into your app from a variety of platforms. Especially great if you need PCI or HIPAA compliance.
- MemberStack — 🧐 Add secure user authentication and accept payments on any website. Build a custom SaaS application or premium community.
- Memberful — 🧐 Membership software to create paid communities. Lots of integrations with other no-code tools.
Backend as a Service for Complex Apps
These tools remove concerns about data management, data storage, user management, and file storage.
- Xano — 🧐🤩🥰🤯 Build a backend for your web/mobile app without code. Includes custom API endpoints, easy-to-edit database, and simple UI.
- Hasura — 🧐🤩🥰🤯 Build applications with realtime data and authentication on top of GraphQL. The easiest way to build a modern API-based backend.
- AppWrite — 🧐🥰🤓🤯 A community driven, open-source backend for web and mobile. Supports user accounts, database, and file uploads.
- Base API — 🧐🥰🤓🤯 Simple, easy-to-use interface with support for authentication, sending emails, uploading files, and a lot more!
- Supabase — 🧐🥰🤯 An open-source alternative to Firebase. Realtime data. Generates APIs automatically. In early stage of development.
- Firebase — 🤩🥰 One of the faster ways to build a web app, with support for realtime data, user accounts, and everything you need out of the box.
- Prisma — 🥰 Provides a front-end for your database that makes it easier to work with (query builder, migrations, editing data).
- AWS AppSync — 🧐 GraphQL + user authentication as a service and built right into the AWS ecosystem.
- Nhost — 🧐🤓 Like firebase, but with SQL and GraphQL instead of noSQL and REST. Has user accounts and file uploading built in.
App Generators
These give you a head start in developing an app and often come with crisp code, beautiful UI components, admin dashboards, and seamless interfaces.
- Divjoy — 🥰🧐🤓 Generates a full-stack React application with a landing page, authentication, database, and hosting configuration built in. Really cool!
- Create React App — 🥰🧐 The officially supported way to create single-page React applications. It offers a modern build setup with no configuration.
- React Slingshot — 🧐 React starter kit with Redux, Babel, React Router, and PostCSS built in.
Complex Visual Web App Builders
These make some things easy, but aren't that flexible. I think these are mostly for building back-office apps and not user facing apps. Also might not be mobile friendly.
- AppGyver — 🧐🤯 A state-of-the-art visual app builder with high security and a good database. It's geared towards enterprise, but free for smaller customers.
- Bildr — 🥰🧐 A powerful way to build interactive websites. Interface is like a design tool (e.g. Figma) instead of a standard website builder.
- UI Bakery — 🥰🧐 Build front-end UI components using their visual builder and export nicely formatted Angular code.
- Bubble — 🧐 Visual web app builder. Leader in the space. You can use a template from Zeroqode to get started or use their How to Build tutorials.
SaaS Generators
These give you a head start in starting a full online service business and they usually come with landing pages, payment integration, and some UI components.
- Gravity — 🧐🤓🤯 A Node.js SaaS boilerplate with React UI that comes with support for subscriptions, user accounts, flexible database support, and more.
- Bedrock — 🥰🧐🤯 A modern full-stack Next.js & GraphQL boilerplate with user authentication, subscription payments, teams, and invitations!
- Laravel Spark — 🥰🧐🤯 A Laravel package that provides scaffolding for your SaaaS app: subscriptions, invoices, Bootstrap CSS, backend APIs, and Vue.js.
- Ship SaaS — 🧐🤓 A SaaS starter that uses Next.js, Tailwindcss, Stripe, and Supabase.
- Jabloon — 🧐🤓 A Ruby on Rails SaaS starter kit that uses Tailwind CSS + Stimulus JS and has payments, auth, email templates, and UI components.
- Bullet Train — 🥰🧐🤓 A Ruby on Rails Saas template that comes with some UI components and has user accounts, subscriptions, and good test coverage.
- SaaS App — 🧐 Open-source SaaS starter kit built on React and Node. Supports user accounts, teams, Stripe subscriptions, and file uploads.
- Wave — 🧐 Out of the box Authentication, Subscriptions, Invoices, Announcements, User Profiles, API, and more.
Convert API to a SaaS
If you're a developer who can build useful APIs, but doesn't want to add billing, memberships, and marketing, these can get you set up quickly.
- SaaSBox — 🧐 Plugin in your API and get a Saas product that you can charge money for, including a user management dashboard and simple landing page.
- Saasify — 🧐 Monetizing your API easily as a SaaS product, and get user accounts, subscriptions, and developer documentation built in.
All-in-One SaaS Management
You have an online business, but don't know how to manage customer feedback, handle billing, or integrate a help desk. Start here.
- Outseta — 🧐🤯 An all-in-one SaaS management platform. Includes an embeddable billing widget, CRM, email lists, help desk, and authentication.
Traditional Approaches to Flattening the Stack
The first generation of all-in-one web app frameworks that made it much easier to create powerful online products.
- Rails — 🥰🧐🤯 A modern, full stack web app framework with a huge community, tons of resources, and many examples of successful products built on it.
- Laravel — 🥰🧐🤓🤯 An amazing and easy-to-use full stack framework, with a huge ecosystem, exciting community, and lots of cool plugins.
- Django — 🥰 The alternative to Rails for developers who love Python. Great community, excellent documentation, and a lot of powerful features.
- Adonis — 🧐 A batteries included Node.js framework that supports routing, sessions, auth, file uploads, emails, and even web sockets.
New Approaches to Flattening the Stack
These solutions try to keep the benefits of modern frameworks (developer ergonomics, real-time updates, component front-ends), while removing the headaches (asset bundling or server-side rendering or too much to keep track of)
- Remake — 🤩🥰🤓🤯 I made this product. It lets you define web app functionality using nothing more than a few HTML attributes.
- Blitz — 🧐🥰🤓🤯 A framework that's really taking off! A full-stack Node.js framework that lets you import server code in your React components!
- Livewire — 🧐🥰🤓🤯 A full-stack framework for Laravel that makes building dynamic interfaces simple, without leaving the comfort of Laravel.
- Remix — 🧐🥰🤓🤯 A React framework by the creators of React Router. Adds APIs and conventions for server rendering, data loading, routing, and more!
- RedwoodJS — 🧐🥰🤓 A React framework that makes building a full-stack web app feel like building a Jamstack website. Uses GraphQL and Prisma.
- Inertia.js — 🧐🥰🤓 An exciting framework that gives you the instant, real-time interactivity of front-end frameworks with classic server-driven code.
- Hyperstack — 🧐🤯 Build your UI, your front-end logic, and your backend logic all in one language: Ruby!
Revolutionary Approaches to Flattening the Stack
Some of the most interesting and revolutionary tools are in this category. These tools allow tons of flexibility while completely removing at least one full layer of the product development stack (e.g. database, back-end, build tool, hand-off).
- Elm — 🧐🥰🤓🤯 A language that helped inspire React! It has a simple, easy-to-use API, helps saves you time, and compiles down to plain JavaScript.
- Imba — 🧐🥰🤓🤯 An amazing new language designed specifically for building web applications. Based on Ruby. Treats DOM elements as first-class citizens.
- Mavo — 🧐🤓🤯 Build interactive websites and web apps using a declarative language that harnesses the simplicity of HTML.
- Phoenix LiveView — 🧐🥰🤯 This is a very exciting framework that lets you build web apps with real-time experiences using server-rendered HTML.
- Alan — 🧐🤓🤯 A framework that uses a high-level model-based configuration to output a software application. Looks very promising.
- Anvil — 🧐 Build full-stack web apps with only Python. An all-in-one framework that comes with a UI builder, database connector, and user accounts.
Exciting Frameworks & Stacks
These are some of the most exciting combos in the front-end framework world.
- React + (Next.js or Gatsby) — 🧐 Build full-stack Jamstack web apps on top of React with some good conventions and a strong ecosystem.
- Svelte + Sapper — 🧐 File-based routing and code splitting, built on top of Svelte.
- Vue.js + Gridsome — 🧐 Lets you consume APIs from anywhere, transform it into a GraphQL API, and render it with Vue.js.
- Vapor — 🥰 A server-side Swift framework that provides a nice interface for all the common web app APIs.
- Marko — 🧐 A front-end JS framework with a focus on best-in-class performance. Supports server-rendering without too much work.
- Meteor — 🤩 A framework for building real-time web apps that has everything built in! Real-time database, user accounts, shared client/server code.
Auto-Generated Admin Panels
Uses a database schema to auto-generate a UI that lets your manage users and app data easily.
- Forest Admin — 🧐🥰🤯 A framework for building powerful admin panels. Can be combined with Hasura for super-powered development capabilities!
- BaseDash — 🧐🥰🤯 Edit a production database with the ease of editing a spreadsheet! All changes are versioned.
- Backpack for Laravel — 🧐🥰🤓 Lets you manage your back-end models, create new pages, change user roles, see debug logs, and manage files!
- React Admin — 🧐🥰 Build a usable admin interface for all your app data and users with very little effort.
Generate UI Quickly Using a Visual Builder
These UI frameworks come partially pre-assembled or let you build UI with a visual builder
- WeWeb — 🧐🤓 Create a website on top of a custom data source (Airtable, Google Sheets, etc.) with the flexibility of a drag-and-drop website builder.
- Visly — 🧐 Build React components using a visual design program that behaves like Sketch or Figma.
- Chakra UI and OpenChakra — 🧐🥰 An open-source component library for React that comes with a visual drag-and-drop builder.
- Modulz — 🧐🥰 Close the gap between design and code by creating your front-end components in an interface design tool.
- Hadron — 🧐 Another interface design tool that doubles as a front-end component builder. Unifies your design system in one app.
- Startup 3 — 🧐 A beautiful website builder that's fast and easy to use with the help of pre-designed blocks.
- Frontendor — Generate landing pages by copy and pasting blocks of code. Built on Bootstrap.
Generate UI Quickly With Pre-Built UI Components
These UI frameworks come with pages and components pre-built, so you can just piece them together like a puzzle to create a great web app.
- Tailwind UI — 🤩🥰🤓🤯 Generate components for your project by using Tailwind beautiful components hand-crafted by the creators of Tailwind.
- Shuffle.dev — 🧐🤓🤯 Truly amazing. Use this drag-and-drop builder to make a website with Tailwind, Bootstrap, Bulma, or the Material UI CSS framework.
- Tailwind Starter Kit — 🧐 A quick and open-source way to get started with your project by using pre-built Tailwind CSS components.
- MerakiUI — 🧐 Beautiful open-source TailwindCSS components.
- Tails — 🧐 A drag and drop page creator based on TailwindCSS. Over 120+ components to help you build websites.
- Tail-Kit — 🧐 Over 250 free components and free templates, based on Tailwind CSS 2.0. Just copy and paste the code.
- Kutty — 🧐 Accessible and reusable TailwindCSS components that are commonly used in web applications
Generate UI Quickly (Assembly Required)
You still need to take care of the back-end, but these easy-to-use libraries will make your front-end look nice without much work
- TailwindCSS — 🤩🥰🤓🤯 A utility-first CSS framework that can be composed to build any design, directly in your HTML markup.
- Framework7 — 🧐🤓🤯 A free and open-source framework to develop mobile, desktop or web apps with native look and feel.
- Ant Design — 🧐🥰 An absolutely phenomenal CSS framework that looks beautiful, is accessible, and supports tons of components.
- TurretCSS — 🧐 An amazing, accessible, and beautiful CSS framework for creating intuitive UI quickly.
- Material Design Components — 🤩🥰 Made by Google. Well-designed, beautiful, reliable components for use in a web application.
- Bulma — 🤩🥰🤓 A CSS framework for building UI components quickly. A nice alternative to Bootstrap.
- Daisy UI — 🧐 Beautiful, easy to use component library built on top of TailwindCSS.
- Semantic UI — 🧐🥰 A flexible and thoroughly documented CSS framework with support for a lot of different components and themes.
- Quasar — 🧐 A pretty advanced Vue.js component library that can produce a multi-platform app from the same code base.
Workflow Builders & API Automators
Connect different apps and their events, so you can create an automated process to run your business instead of doing things manually.
- Zapier — 🤩🥰 One of the original no-code automation tools. Connect websites, web apps, and data and automate your work.
- Integromat — 🧐🥰🤯 An advanced Zapier alternative that has a lot more power, but is also a little more complex to work with. Amazingly powerful!
- Parabola — 🧐🥰 Build flows and pipelines by using pre-built components that let you extract, transform, and load data.
- Huginn — 🧐🤯 A hackable, open-source version of Zapier on your own server. It can read the web, watch for events, and take actions on your behalf.
- Pipedream — 🧐🥰 Connect APIs with code and pre-built building blocks. Makes building integrations for your product a lot faster.
- Story.ai — 🧐 Use natural language to create workflows and connect APIs. Allows non-developers to harness the power of workflow builders.
- Autocode by Standard Library — 🧐 A Zapier alternative aimed at developers. Makes it easy to connect different services together.
Marketing Automation
Help customers explore your product and collect leads with automated forms.
- Headlime — 🤩🤓 Automatically generates headline and page copy for your website and leaves room for you to improve it if you need to.
- Autopilot — 🧐 Capture and convert leads using forms, emails, and workflow automations.
- TextIt — 🧐 Build scalable, interactive chatbots on any channel without writing any code.
Spreadsheet as a Database
A quick and easy way to get started prototyping an idea. Can be used to hand off a small project to a client.
- Stein — 🧐 Use Google Sheets as a low-effort headless CMS. Perfect for prototyping and simple client websites.
- Sheety — 🧐 Turn their spreadsheets into powerful APIs to rapidly develop prototypes and websites. Comes with pre-build templates.
- Sheet.best — 🧐 Turn a Google Sheet into an API that you can use to power any website. Comes with a full CRUD API and some security features.
- Sheetsu — 🧐 Connect Google Sheets to anything - Web, Mobile, or use it as an API for anything else.
Spreadsheet to Website
Make beautiful-looking websites using data from a simple spreadsheet. One of the fastest ways to experiment with a new idea.
- Pory — 🧐🥰🤓 Create beautiful websites using content from Airtable. Supports filtering, search, and custom domains.
- Table2Site — 🧐🤓 Turn an Airtable spreadsheet into a website. Supports custom domains and CSS.
- Siteoly — 🧐🤓 Turn a Google Sheet into a website. Supports custom domains. Comes with 15 templates, search, and filtering.
- Sheet2Site — 🧐🤓 Turn a Google Sheet into a website. Supports custom domains and includes 12 templates, search, and filtering.
- SpreadSimple — 🧐 Create a beautiful website using Google Sheets data. Supports search, filters, card customization, and custom domains.
- Softr — 🧐 Create websites and portals using Airtable data. Comes with a lot of nice templates, including upvoting sites and job boards.
Internal Spreadsheets with Advanced Functionality
These tools work as internal admin dashboards by adding advanced capabilities onto the spreadsheet model
- Notion — 🤩🥰🤯 One of the most useful and flexible apps for keeping track of projects, planning, and collaborating with a team.
- Airtable — 🧐🥰🤯 A spreadsheet that works like an app, lets you have more control over data, and comes with templates for collaborating with a team.
- Baserow — 🧐🤯 An open-source, self-hosted Airtable alternative build on top of PostgreSQL. Build a database with no-code!
- Rows — 🧐🤯 It's basically a bunch of nicely designed no-code tools you can use to automate workflows for your team. Looks really promising.
- Fibery — 🧐🤯 A workflow builder inside a collaboration app. Lets your team customize and control how you work together.
- Retool — 🥰🧐 Build internal apps and dashboards for your team with an advanced interface that makes interacting with a database incredibly easy.
- Clay — 🧐 An advanced filterable, sortable, rich spreadsheet that can auto-fill data based on the information you need.
- Coda — 🧐 Create advanced, internal apps that work like spreadsheets. Using data, filtering, automation, and templates, you can build any internal workflow.
- Actiondesk — 🧐 Pull in data from any source and let your team generate spreadsheets and reports on it. Looks powerful
- Stacker — 🧐 Use Google Sheets and Airtable as the foundation for your admin panels and internal workflows. Allows customizing the UI and theming.
- Amazon Honeycode — 🧐 Build custom, internal applications using a visual builder combined with a spreadsheet interface.
Rapid Application Development Frameworks
These tools focus on speed above all else. They might lose some flexibility, but your ability to get to market fast and test out your idea will more than make up for it.
- Alpine.js — 🧐🥰🤓🤯 If you need to add a bit of behavior to your page, but don't want to import a full view library like React or Vue, Alpine.js is perfect.
- Dark — 🧐🥰🤓🤯 Makes setting up a simple backend with persistent storage a breeze. Provisioning databases, deploying, security, etc. is all taken care of.
- htmx — 🧐🥰🤯 Access AJAX, CSS Transitions, WebSockets and AJAX calls using HTML attributes, so you can build modern user interfaces fast.
- Streamlit — 🧐🥰🤯 Open-source app framework for Machine Learning and Data Science teams to create beautiful data apps with Python.
- DataFormJS — 🧐🤯 A really cool web app framework that can use React/Vue to render, but takes care of other behavior with simple HTML attributes.
- Alpas — 🧐 A batteries-included, yet a modular, web framework for Kotlin with a very strong focus on developers' productivity.
- Buffalo — 🧐 A framework for building web apps with Go, which supports routing, templating, and an asset pipeline.
Rapid API Development Frameworks
These tools allow you to generate an API from a database very quickly, potentially saving years of work.
- PostgREST — 🧐 A standalone web server that turns your PostgreSQL database directly into a RESTful API.
- PostGraphile — 🧐 Instantly spin-up a GraphQL API server by pointing PostGraphile at your existing PostgreSQL database.
- Fastify — 🧐 A web framework highly focused on providing the best developer experience with the least overhead and a powerful plugin architecture.
Convert 3rd Party Websites into APIs
These tools scan 3rd party websites, assemble their info into a structured format, and let you use the data in your own web app
- ClickDiv — 🧐 Run automated tasks on different websites and assemble the results into data that can be passed on to other services.
- ParseHub — 🧐 An advanced parser that can crawl a website and assemble the results into structured data.
- ScrapingBee — 🧐 Uses powerful tech to get around blocking and extracts all the data you need from any website.
- ScrapeHero — 🧐 Convert a website into high-quality, structured data and convert it to any format. Useful for conducting research or collecting leads.
- Axiom — 🧐 Lets you automate by recording actions, like an Excel macro, but for the whole web. It can plugin to APIs and reach places tools like Zapier can’t.
Quick Prototyping
I hesitated to add this section, but I think it's relevant. As design and development become more entangled, everything should start to feel as easy as prototyping.
- Figma — 🤩 🥰🤯 Create clickable prototypes and high-fidelity designs using a real time, collaborative design tool. Great with the Ant Design UI Kit.
- ProtoPie — 🧐🥰 Rapidly iterate on UX designs by building out fully featured prototypes with real data and real interactions.
- MirageJS — 🧐 Mock out rich, dynamic API endpoints for testing features and building prototypes without building a real backend.
Landing Page Templates
These tools will help bootstrap your marketing website by giving you the HTML and CSS to get started. You'll need to modify them and host it yourself.
- Cruip — 🧐🤓 Beautifully designed HTML, React, Vue.js, and Tailwind templates. You can set up a startup landing page instantly.
- Landing Folio — 🧐🤓 The best free and premium landing pages curated to ensure the best quality for your next design project.
High-Level CMS For Building Landing Pages
These tools focus more on high-level components, letting you define the content, but not getting into the details
- Notion + Super — An amazing pair of tools that can get you started faster than almost any other stack.
- Carrd
- Versoly
- Landen
- UnicornPlatform
- Unbounce
- Everypage (lets you define content in JSON and handles the rest for you!)
CMS with Unique Approaches
Uses web native tools (like online spreadsheets) that are familiar to users and can easily hook into multiple platforms to serve as a back-end
- Vapid (one of my favorites)
- Editmode — a headless CMS with inline content editing (kind of like TinaCMS)
Headless CMS
Makes it easy to manage data, so you can just focus on displaying it.
Blog & Note Taking
When you want to share your journey with customers and build a community, which tools do you turn to?
- Blot (amazing — pretty much the perfect blog platform)
- Obsidian
- Collected Notes
CMS
Usually not great for building a full-fledged web app, but great for managing a website builder.
- Craft (I'd like to try this)
- Statamic (I'd like to try this)
- Kirby (I'd like to try this)
- Gatsby + headless CMS (I'd like to try this)
- Webflow (gives fine-grained control)
- OctoberCMS
Beyond CMS
More powerful than the standard CMS
- Ycode — Build and design a website visually for multiple clients, let them login to view or edit data, and deploy in seconds.
- Budibase — 🧐 Set up a web app's backend (database, models, records) using a visual interface and connect it to your front-end through a visual builder.
- Wordpress (headless CMS, website builder, e-commerce) + Elementor or Sage + ACF
- TinaCMS
- Factor (not sure exactly what this is yet, but claims to save tons of time!)
- Keystone 5 (CMS / App boilerplate)
- Webiny (headless CMS + ui builder)
- Stackbit (CMS for JAMstack)
- Primo (development a component library in the cloud, while generating static assets, and give non-technical users a CMS interface for editing data. it's an IDE/CMS/SSG all in one product!)
Technical Documentation
Tools for Gathering Customer Feedback
- Craft
- FullStory (screen recording; beautiful app)
- LogRocket (screen recording & bug tracking)
- User Interviews (market research)
- BugFeedr
- Chatfuel (answer customer requests with FB Messenger)
- Dexter (chatbot builder)
Roadmaps, Announcements, & Feature Voting
How do you keep track of everything you're working on and share it with other people?
Payment & Pricing Integration
- Paddle (add payments to your SaaS, simple setup)
- Manifold (add a pricing table and flow to your app)
- Chargebee
- SuperPay (looks really easy to use)
Hosting
- Netlify — Serverless deployment platform with a git-based workflow, automated deployments, shareable previews, and other features.
- Vercel — Fast deployment/hosting with a great developer experience. Works great with Next.js.
- Render — Hosting platform for both static and dynamic apps. Free SSL, global CDN, private networks, and auto deploys from Git.
- Fly — A CDN for apps. Deploy apps close to your users. Can make apps much faster for users.
Marketplace Creators
These tools help you set up a marketplace or membership-based website really quickly
- ShareTribe
- Spectrum
- WorkOs (add Single Sign-on to your app for enterprise customers)
Membership & Online Course Creators
- Ghost (absolutely beautiful)
- Circle —
- Mighty Networks —
- Podia —
- Teachable —
- Discord —
- Slack —
- Flurly —
- Gumroad —
Form Endpoints
These services let you collect visitor information and possibly display it somewhere else.
- Formik
- Tally
- Paperform
- Airtable
- Formspree (this is the one I use and it's very reliable)
- Google Forms
- Arengu (this one seems unique: supports a lot of use cases, like user registration)
Email List Automation
- Buttondown —
- Sidemail — Create an email list, then send automatic campaigns and newsletters. Also sends transactional emails (e.g. "Thanks for your purchase!")
- Mailerlite — Built for small businesses. Email campaigns, landing pages, and popup sign up forms.
- ConvertKit — Built for indie makers. Email campaigns, landing pages, and popup sign up forms.
- Mailcoach —
- ListMonk —
- Sendy —
Addons & Popups
- Poptin — Popups and embeddable forms to get visitors' email addresses and send them followup campaigns.
- GetSiteControl — Popups and forms. Really nice product.
- Jolt — 🧐🤓 Add comments, analytics, email forms, and more without any code or site builds.
- StaticKit — Squarely aimed at the JAMstack crowd. If you have a static website that you want to add forms and payments to, this might be the ticket.
Purpose-Built Apps
These tools help you do one thing really well with very little effort.
- Cloakist — 🤩🤓 Put any type of link behind a custom domain. Could be an Airtable form, ClickUp document, Adobe Spark page, or Trello board.
- RoomService.dev — Add real-time collaboration to a React app in a few minutes
- Flatfile (add a data importing feature into your app)
- ConvertCalculator (build a calculator for your product)
- Outgrow (build an interactive calculator or quiz)
- Dash is a framework for building data visualization web apps in pure Python.
- Luna — WYSIWYG language for data processing. Very exciting!
- Kapwing — A collaborative platform for creating and editing images, videos, and GIFs. Has a powerful studio editor as well as purpose-built tools.
Database Query to Application
These tools allow you to build app views from database queries, generating the front-end automatically
New Languages
Languages that let you do things differently than normal and save a lot of time.
- Mint — A programming language purpose-built for creating SPAs (single page applications). Used to build Base API.
High-Level Web App Definition Languages
These tools allow you to create a very high-level definition of your app, which is then seamlessly transpiled into the language/framework of your choice.
- Wasp — 🧐🤓🤯 A declarative language that makes it really easy to build full-stack web apps while still using the latest technologies
Website Builder Builders
These tools work one level up from normal website builders, allowing you to make your own, custom website builder.
- GrapesJS — 🧐🤯 An open-source framework that lets you make your own website builder.
Convert a Static Design into An App
This seems like a big promise to fulfill, but if they can pull it off it would be amazing.
- Relate — 🧐 A design + development platform all-in-one with real-time collaboration, so no hand-off from design to development is required.
- Supernova Studio — 🧐 Translates Sketch and Adobe XD designs into code — no hand-off from design to development. Perfect for creating design systems.
- Yotako — 🧐 Tries to understand what kind of user interface you are designing and generates UI components based on that.
Comments & Tips
"Combine Hasura (automatic GraphQL on top of PostgreSQL) with React Admin (low code CRUD apps) and you can build an entire back office admin suite or form app (API endpoints and admin front end) in a matter of hours." — cpursley on HN
"We ended up using AppSync and it is fairly impressive. I highly recommend anyone who is stuck in the AWS ecosystem to check it out. AppSync integrates with a lot of other AWS services (Cognito, S3) very easily and allows you to use Dynamo/Aurora/RDS/Elastic as data sources. On top of this, you can also use Lambda to implement resolvers that need more intense business logic, making the service incredibly powerful." — afvictory on HN
"PostgREST is performant, stable, and transparent. It allows us to bootstrap projects really fast, and to focus on our data and application instead of building out the ORM layer." — Anupam Garg from a testimonial
"As I was looking at some of these workflows, I couldn't help but think how there will be this eventual shift like with Craiglist where companies will spring up that just focus on certain more complex popular workflows. . . . So my advice if you're looking for your next indie software idea. Just observe what these no-coders are automating on Zapier and build a nice UI around it." Kameron Tanseli from a blog post
Further Reading
]]>There's nothing else like it. Hacker News is too harsh. Reddit discourages self-promotion in 90% of its subreddits. Indie Hackers has too much self-promotion.
In all this noise, Product Hunt is an oasis of pure, early-startup excitement about, well,
]]>Let me begin by saying I love Product Hunt.
There's nothing else like it. Hacker News is too harsh. Reddit discourages self-promotion in 90% of its subreddits. Indie Hackers has too much self-promotion.
In all this noise, Product Hunt is an oasis of pure, early-startup excitement about, well, products — and the people who build them.
As an entrepreneur and solo founder, nothing appeals to me more than a community site designed around building new ideas, showing them off to the world, and putting them in people's hands.
It's a wonderful corner of the internet that I enjoy visiting daily.

Launching my first product by accident
If you want to skip to the end, where I summarize Product Hunt's UX bugs and tell you how to avoid them, click here.
My first serious attempt at building a product for other people was Artisfy, a marketplace for hiring freelance illustrators for 1 hour at a time.
After spending 3 months designing every page in Sketch, 5 months building out the front-end code, and 6 months implementing a backend with Meteor, someone named Nate posted Artisfy to Product Hunt without telling me.
It was one of the best surprises I've ever received.
At 10am, on November 29, 2016 — 3 days after my birthday — I realized I was getting sign ups from real, actual freelance artists and users. By 10:15am, I realized where the traffic was coming from. Imagine my surprise when I realized Artisfy was featured in the #2 spot on the front page of my favorite website.
I was ecstatic.
Launching my second product on purpose (and the #1 UX bug)
After the success of Artisfy's surprise launch, I started talking with my new users. I emailed them, did lots of phone calls and video calls, went to meet them at coffee shops all around Boston and Cambridge, trying to learn what they wanted from Artisfy.
It didn't take long to realize most of them didn't need a new marketplace website. There were thousands of those already and many of the freelancers I talked to were looking to move off of them as soon as possible and recruit their own clients. Gradually, it sunk in for me: freelance illustrators needed a home for their professional services.
So, I set off to work on a brand new product, in the early days of 2017: RequestCreative.
This was a really, really exciting time for me. I was working out of a warm and lively co-working space and I got to focus on building RequestCreative every single day. I felt very lucky.
And, I had a plan for getting some early traction: Product Hunt Ship.
Product Hunt Ship has 2 big features.
- The ability to schedule your product post
- Promotion of your product on the Product Hunt home page!!!
If you can't tell, the second feature is, by far, the more exciting one 😆
You see, Product Hunt gets about 5 million visits per month (according to SimilarWeb). So, even if you're only featured 1% of the time (and I think it's more than that), that's a total of 5,000 people per month seeing your product.
That's an incredible value, especially since you know this audience is 1) interested in early-stage products and 2) might subscribe with just the click of the button to hear more about your startup in the future.
So, of course, I signed up right away and
- Set up a Ship page
- Uploaded my logo and media
- Double checked to make sure everything looked right
Then I waited...
And over the course of the next three weeks, 2 subscribers trickled in.
They were both people I knew. 😫
It turns out, I had missed a toggle button that was buried deep in the Product Hunt Ship interface: "Promote on Product Hunt", which was off by default.
- This very important toggle wasn't mentioned on the Product Hunt home page after I logged in, nor on my personal profile page — nor on my product's Edit Post page.
- It also wasn't mentioned on the Product Hunt Ship Dashboard page.
- It was buried, at the bottom of the sidebar, on the product's Upcoming page about 2/3 of the way down
That's quite a lot of burying for a feature that most users aren't even aware they should be looking for. I personally assumed that — since it was, by far, the most valuable feature of Product Hunt Ship — it would be turned on by default.
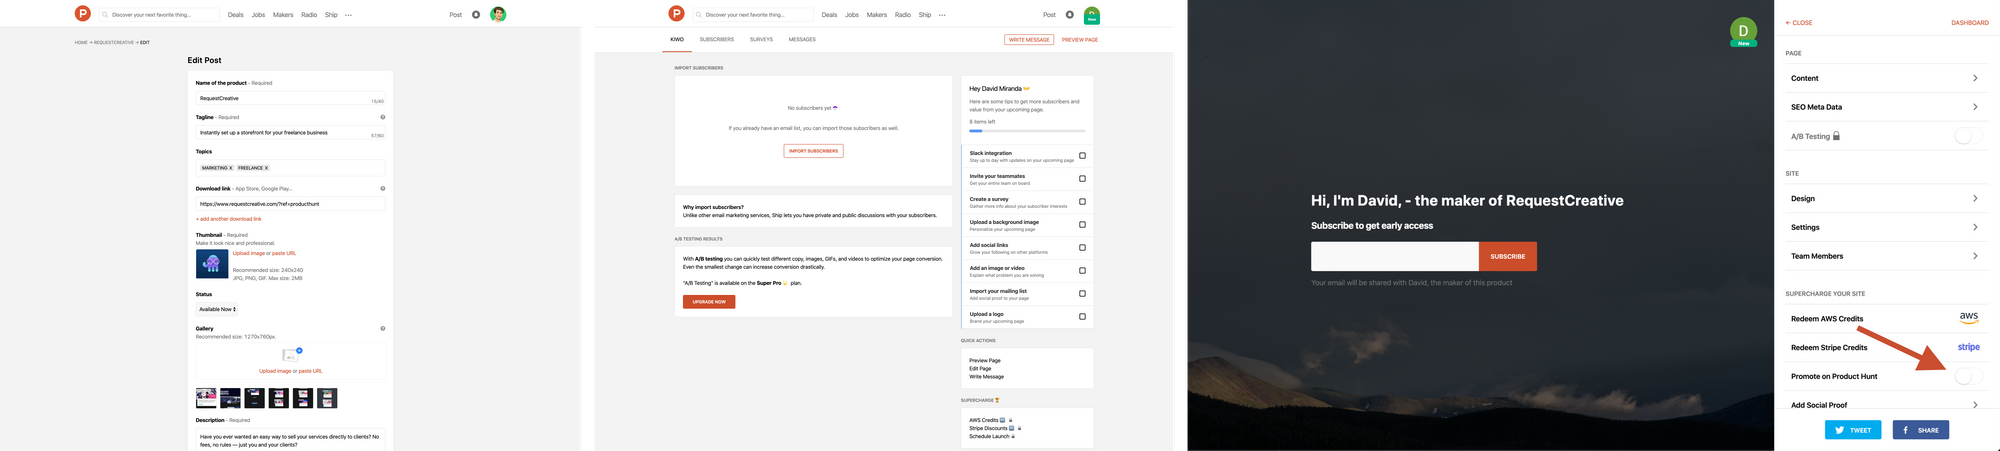
This is currently the #1 UX bug on Product Hunt Ship and it ruined my second product launch.
During the launch day, when I didn't know about this little, secret toggle that unlocks 90% of the value of Product Hunt Ship, I was still blaming myself for not being able to get more subscribers.
I thought:
Maybe my copywriting is off
Maybe people just aren't interested in RequestCreative's promise
Maybe there was some secret algorithm that Product Hunt used to determine who was featured in the Upcoming box and I just wasn't chosen...
To be fair, Product Hunt Ship did send me one email with a mention of the "Promote on Product Hunt" toggle.
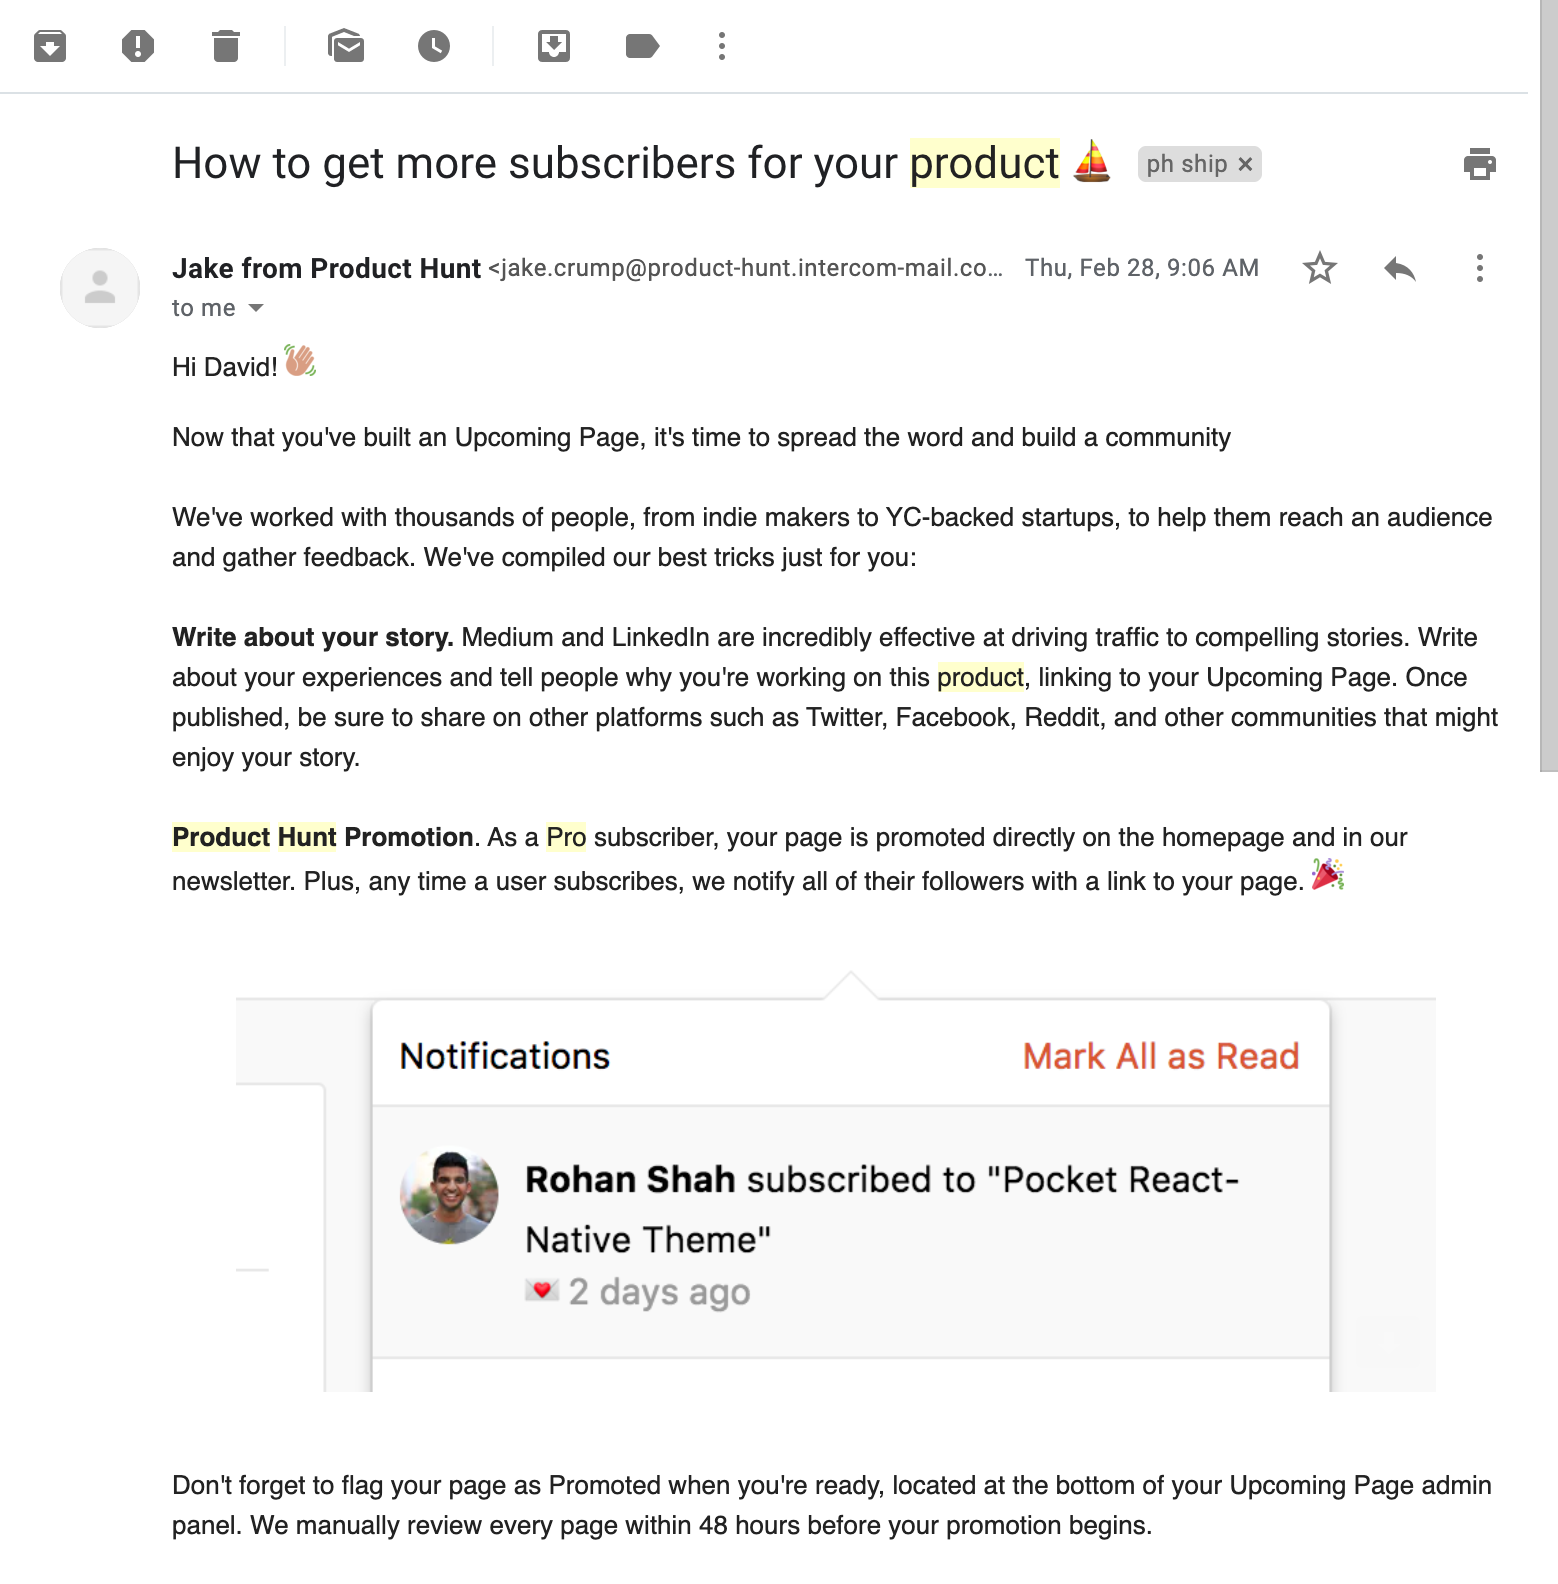
However, their mention of it was in the second (not the first) onboarding email, hidden way below the fold on mobile devices. To find it, you had to read through a bunch of other (mostly useless) copy and scroll past a big, centered image.
No one has time for that.
And this was the only time in the onboarding they called it out.
I ended up spending $79 on Ship (and a month prepping for the launch) for almost no value — all because I missed this single sentence.
How to fix this UX bug
I think the solution to this UX bug is simple:
- The first email Ship subscribers receive should have the subject line: "Your Product is Not Being Promoted Yet". That would pretty much do it. If you really want to be nice about it, maybe send them a followup 7 days later with the same subject line.
- Then, on the user's list of upcoming products, in bold, red letters, it should probably say: this product is "Not being promoted yet"
- Finally, on your Ship dashboard, at the top of the page, above the completely useless graph that was stuck at 2 users during my entire pre-launch, and highlighted in a bright red background, maybe say something like: "Do you want to enable promotion on Product Hunt? Yes or No"
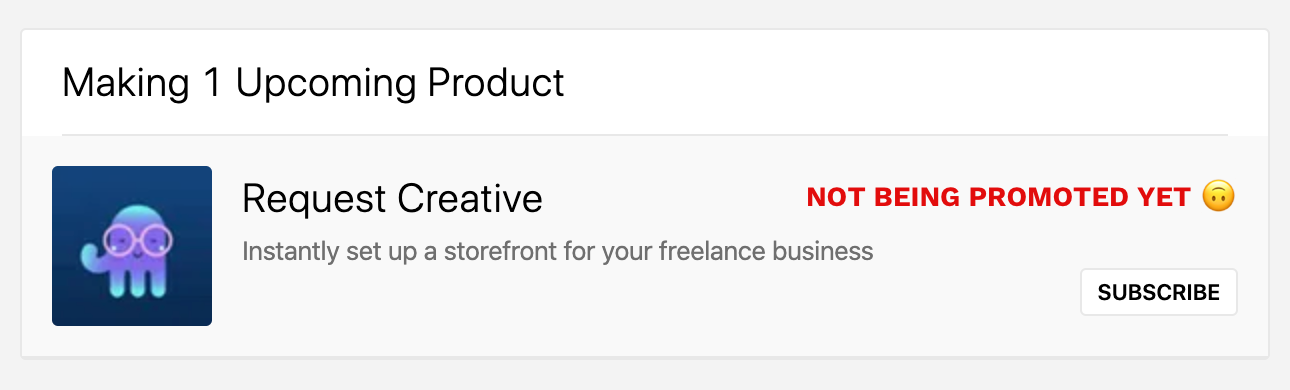
Or, of course, they could just turn on promoting products by default, since it's literally the #1 reason anyone signs up for Ship and it's absolutely zany to charge for value you're not providing.
My first product's (failed) launch
If you're curious about how RequestCreative did on launch day... I won't lie and tell you I wasn't disappointed.
It hung out, just off of the front page, all day, right under the "Show More" button.
It was a little heart breaking.
My second product's tumultuous & amazing non-launch (and UX bugs #2 and #3)
After RequestCreative didn't land with a splash, I was a bit disheartened. I truly thought I had created something useful and amazing — something the Product Hunt community would love.
When it didn't do well, it was hard to keep working on it, even thought it's something I had invested a year of my life into.
For anyone struggling with this right now — the anticipation or reality of a "failed" launch — I'd strongly recommend watching this excellent video by YC Startup School:
"Please don't fall in love with your MVP. It's just step 1 in a journey."

So, anyways, as a way of recovering, I focused on something fun. I started tinkering around with the code behind RequestCreative and slowly extracting it into a web framework.
At first, I told myself it was just for fun. But then I was making notes and taping them to my wall — and drawing diagrams — and seeing if what I had on my hands was truly as groundbreaking as it seemed.
This, eventually, after a year of hard work, became Remake.
Which, kind of, sort of, launched a few weeks ago.
You see, despite visiting Product Hunt nearly every day, I'm still not an expert at it. And, it turns out, I unintentionally sabotaged my launch day with the stupidest mistake possible.
Delaying the launch
On November 11th, I made the decision to delay Remake's launch by 2 days, from 11/20 to 11/22.
My promo video wasn't finished yet, I had on a couple pages of documentation done, and I the website was only 50% done.
Then on November 18th, with the pressure of a quickly approaching launch day mounting again, and still no website ready yet...
I rescheduled again.
To the past... oops 🤪
Like any truly visionary founder, I moved up my MVP launch date to be as early as possible: November 5th — 2 weeks in the past.
🙃
And the thing that surprised me the most: Product Hunt Support simply responded with, "Sure thing that's changed for you now!"
The next morning, I checked on it and realized my unbelievable mistake and the Product Hunt staff quickly rectified the situation.
Remake was now back to being scheduled for the future — December 5th — and I was going to be ready!
(However, this simple rescheduling-to-the-past mistake would soon come back to haunt me...)
UX Mistake #2
Before we get to the true comedy of errors of this story, this is where Product Hunt's UX mistake #2 comes in.
The only reason I needed to talk to a human to reschedule my post (instead of doing it myself) was because their scheduler only allows you to select a date a few weeks out.
And, although it gives the mistaken impression that you can keep pushing it further out every couple of weeks, indefinitely — eventually you reach a hard limit.
So, the simple solution here would be to allow people to schedule their product whenever they want to.
Ideally, only in the future. 😆
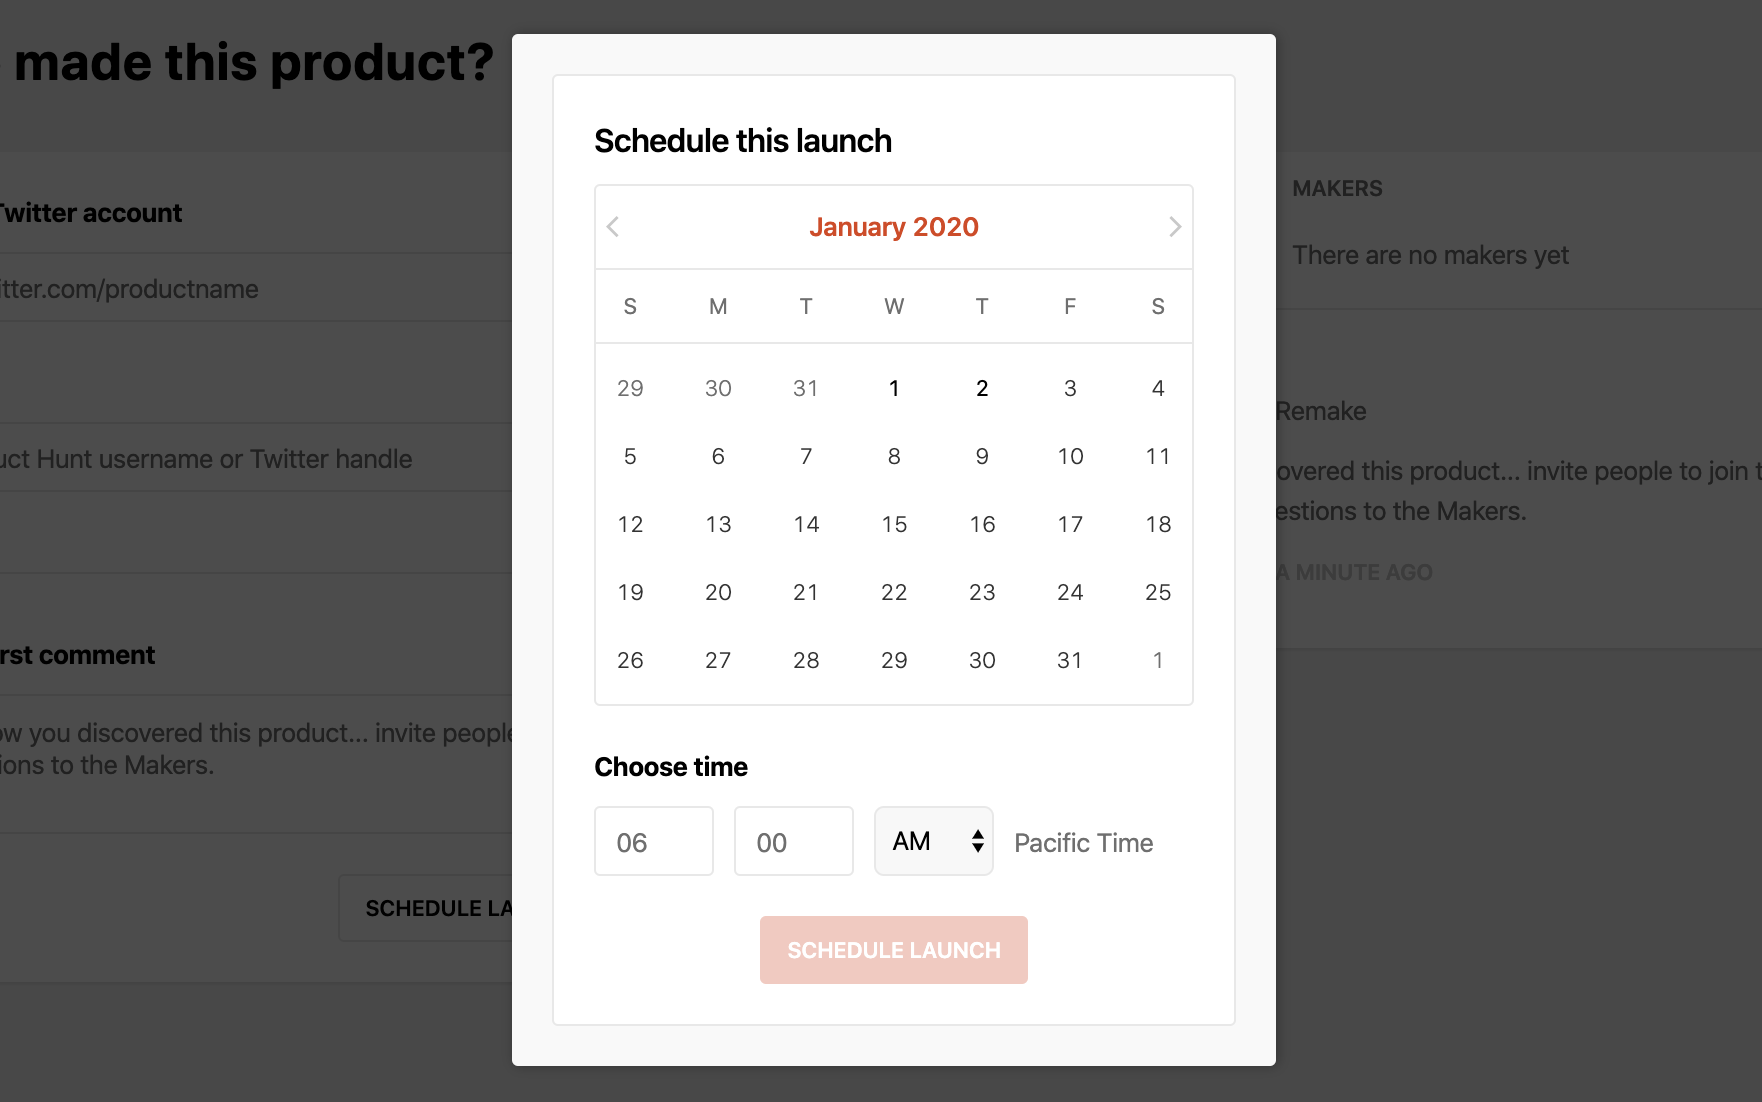
You might wonder: why even schedule your product at all if it turns out to be this complicated — having to reach out to customer support every couple weeks?
Well, it turns out, if you choose not schedule your product's launch, then anyone else can launch your product for you — before you're ready 😳 — even if you have an upcoming product and are paying for Product Hunt Ship.
Launching early, this time around, would've been a disaster — unlike with Artisfy.
You see, at this time, I still thought of Product Hunt as a great source of interested early users and developers and I was really looking forward to knocking it out of the park with a beautiful startup website.
If someone launched my product early, the website would've been the early, very rough, barely coherent documentation site — which provided only a single demo, no email sign up forms, and no substantial information about how to use Remake.
It probably wouldn't have done well — and I wouldn't have been able to launch it again on my own, since it was launched already.
When I spent 3 months of time and energy gearing up for a big Product Hunt release, it simply wasn't worth it to launch early.
The day before launch day
Remember when I mistakenly scheduled my post for November 5th — two weeks in the past?
Well, apparently that caused some major issues with Product Hunt's backend and really came back to bite me the day before launch.
I was in the middle of updating the launch website, when I remembered to check in on my Product Hunt post to make sure everything looked good.
That's when I noticed something really bad:

Remake had suddenly reverted to being posted a month ago. 😣
I reached out to support right away.
As usual, they responded in under an hour and rescheduled the post for December 5th — the following day.
Then, while continuing to prepare my post for launch day — adding some images, refining the copy and headlines — I noticed it happened... again. 😳
At this point, it was the evening before the launch — just a few hours out.
I started panicking:
- What if I was doing something wrong? What if it wasn't a database error on Product Hunt's part, but I was responsible for launching it by mistake?
- Was there a secret toggle (like Ship) somewhere that I wasn't seeing?
- Was the support staff going to think I was trying to cheat the system somehow — and prevent me from launching altogether!?
I quickly looked around on the Edit Post page, looking for anything that might have caused the scheduled date to be canceled and cause my product to launch right away.
And that's when I saw it: a simple little magic toggle that I had never truly understood, but had occasionally toggled when I didn't know what else to do.
I know, I know...you really wouldn't think I design web apps for a living... 🤪 The #1 rule for users of software should be, "don't toggle a magic setting you don't understand."
The two options:

With no further explanation.
I assumed, in my moment of (slight) panic, that these options referred to the status of my product post, not the status of my startup.
You see, a "pre-launch startup" is a technical term in Silicon Valley. It means:
- Your product isn't ready yet.
- It's not available.
- It's pre-launch.
As a Boston native, I don't hear it as much, except when I'm watching YC videos.
So, (somewhat my fault here...) it simply didn't register as having anything to do with the status of my product/startup.
I especially didn't think it would be something that would completely decimate my launch.
So, I set the Status to Pre-launch, contacted customer support to reschedule the post, and promptly forgot about the magic little toggle.
"Please don't make any further changes"
This is about the time someone on the Product Hunt staff told me to stop editing my post, because: "when you update the post, it stops it from being scheduled."
😳
Huh?
Well, um.... okay, I guess. 😐
That made no sense to me, but I figured it was probably because of the scheduling-to-the-past thing from earlier (which must have really caused some hard-to-undo database flag to be set).
I told the marketing freelancer I was working with to not touch the post either — it was completely hands-off until launch time.
We both gently stepped away from the keyboard, hoping and expecting a perfectly normal, relatively successful Product Hunt launch.
I sent out the launch emails and went to bed.
The day of the launch
I woke up on the morning of the launch and checked on the Product Hunt post. It had gotten 7 upvotes already — more than a lot of the other posts, but fewer than some.
It hadn't made it to the home page yet...
But I was still hopeful.
I went for a walk, recorded a quick launch day video for people interested in the project, and went back inside to start my 9 hour launch live stream 😁
I answered questions and emails, got some serious help from @levelsio on a Twitter post that went viral, posted a couple launch posts to Reddit and Designer News — and checked on Product Hunt about 3 times an hour.
For the whole day, I couldn't shake the feeling that Remake should've reached the front page with the amount of votes it was getting.
Then I got a couple of messages from Product Hunt users that Remake wasn't showing up anywhere on Product Hunt — not even when they searched for it. They said they had to go to the "New" tab and scroll forever just to find it.
I started worrying that maybe something had gone really wrong.
Maybe I really had messed up Product Hunt's database with my rescheduling... Or annoyed the staff enough with my requests for them to shadow ban me from the home page...
To be honest, I had no idea what was happening.
I reached out to customer support, once again, towards the end of the day — after not making it onto the home page despite getting more upvotes than 7 of the other products featured there.
I don't understand why my page failed to reach the front page — even under the Show More button. It launched around the same time as a lot of the products at the bottom and received more upvotes than some, but it never made it to the front page.
Did something malfunction with my post again?
Then I got a little cynical: was it an editorial decision? Did the staff prevent my post from hitting the front page because they thought it wasn't good enough?
I scoured Product Hunt's FAQ for answers.
At the very bottom of the FAQ articles in the "Posting" category, I came across a certain article title — that, when I read it, instantly made me realize my big mistake. 🤦♂️

I suddenly remembered back to that toggle on the Edit Post page.
I opened the FAQ article to read it.
Here's what it said:
We encourage people to submit launched products that are available to play with immediately; however, the occasional crowdfunded or pre-launch submission is acceptable if it provides thorough information about the product (e.g. clear video with a product feature walkthrough) and proof that it's not vaporware. That said, we may remove pre-launch submissions and recommend founders to wait until their product has launched before submitting.
I didn't want to admit it to myself, but I had single-handedly sabotaged my own product launch and been responsible for shadow-banning myself from the Product Hunt home page.
I reached out to customer support one more time.
Indeed, that was it.
They reached out to me shortly after, with a link to the article I had just read.
UX mistake #3 and how to fix it
I'm sure a lot of people who launch on Product Hunt know what Pre-launch means and they, also, might understand that it impacts their eligibility to reach the home page.
But, also, maybe they don't.
It would be very, very polite of Product Hunt to just tell you, on the Edit Post page, exactly what Pre-launch means — so more people like me don't sabotage months of work over a misunderstanding.
Why I'm writing this post
So, you might be wondering: what happened to Remake?
Well, actually, thanks to a launch tweet that @levelsio helped me write and share, the launch was actually a big success!
I built a framework called 🧙♂️Remake that lets you build an interactive website, using only HTML:
— David Miranda (@panphora) December 5, 2019
🤖 Build and design an app
🧘♀️ User accounts
🦙 Zero config
🏹 Built-in CRUD features
👇https://t.co/Lh1kVr3XCi
Remake also received a lot of interest on Reddit and Designer News!
All this, despite not receiving any traffic from Product Hunt. Since my product wasn't featured at all or even available in search, Remake ended up sending hundreds of visitors to Product Hunt, but didn't really receive any back.
I'm hoping Product Hunt might consider giving me a redo, but for now I'm happy to just share this, so someone else with a big idea might avoid my mistakes.
For now, Remake is still marked as pre-launch, even though the product, on launch day, was (and has been for months) functional and ready to use!

I only learned what this little dot of invisibility meant on December 6th, after it was too late. If I only I had hovered over it... 👻
So, without further ado:
A Quick TLDR Summary of Product Hunt's UX Mistakes and How to Avoid Them For Your Own Launch
- If you sign up for Product Hunt Ship, no matter what, find the magic "Promote on Product Hunt" toggle and turn it on:

It will help your launch out so, so much and get you a lot of early email subscribers! It's totally worth (even double) the current cost of Ship.
Hint: It's on your upcoming page, in the sidebar, about halfway down, under a few other options you probably don't care about.
2. If you decide to reschedule your launch at any point, check with a friend or coworker first to make sure the launch date you chose is in the future 😜, because otherwise, Product Hunt might schedule it in the past for you — mark it is as already launched — and that could cause a lot of unexpected, totally weird issues for you down the line.
🤷♂️
Seriously, though: I'd recommend claiming your product's URL by scheduling a post and then ask customer support to schedule your launch way in the future.
This way, you'll have plenty of breathing room, and you won't have to deal with the hassle of reaching out to Customer Support every week or two to push push back your launch into the future.
And you can just launch when you want, with no worries or mishaps.
3. Don't touch the Status dropdown on your Edit Post page. Don't ask what it does or what it means. Just don't touch it.

Thanks for reading :)
Reach out if you want any more tips on Product Hunt launches — I'm (very slowly) becoming competent at using it. 😆
The main challenge that Remake.
]]>The main challenge that Remake.js helps a developer like me overcome is organizing data on the fly. When you’re building a web application, you often want to plan things ahead, but with Remake.js you can let that naturally evolve more than in other frameworks.
Why is that?
With some frameworks, you have to put data into components and then attach behaviors to them. It’s relatively easy to move things around, but it still takes some time to think through it.
With Remake.js, components arise naturally after you attach enough functionality and data to them, but they’re not set in stone. You can easily move the data or behavior to a new element and then start working from there.
Let’s take a quick look at what a component in Remake.js might look like:
<div
  class="page-data"
  data-switches="disableTimelineQuickTip(no-auto) pageColorBackgroundPicker selectButtonColorPicker"
  data-i-choices="hideStars hideMasthead"
  data-o-save="pageData"
  data-o-type="object"
  data-o-key-username="david"
  data-o-key-email="[email protected]"
  data-o-key-email-confirmed=""
  data-o-key-hide-stars=""
  data-o-key-hide-masthead="true"
  data-o-default-username="david"
>
</div>
This is the top-level component in a real application. I know this is a lot to take in, but without trying to understand it on your own, just read this:
- Keep track of whether a few components are turned on or not (including the timeline quick tip the page color background picker, and the select button background picker)
- Allow the user to select among multiple choices inside this element regarding whether stars are hidden or not and whether the masthead is hidden or not
- When data on this element is changed, save the data using a function called
pageData() - Attach data to this element in the form of an object
- Add 5 keys to the object that this element represents, including: username, email, whether the email is confirmed, whether stars are hidden or not, and whether the masthead is hidden or not
- If the user tries to change their username to an unsupported value, change it back to the default value of “david”
Now, if you want, you can move this data around simply by moving a couple of these attributes.
That’s the power of Remake.js. It’s easy to move things around / experiment / and attach powerful functionality with a single data attribute.
These are just a few of the very powerful data attributes that Remake.js has.
Now, the thing I want to talk about in this post is how to make where the data shows up more flexible.
First, here’s how it works most of the time:
<div data-o-type="object" data-o-key-name="David"></div>That tells Remake.js that this DOM node contains information, and, when parsed, that information will look like this object:
{name: "David"}Another way to store this information in the DOM is like this:
<div data-o-type="object" data-l-key-name>David</div>The data-l attribute is different from the data-o attribute in that in points somewhere else, instead of its attribute value. The l stands for location. In the above case, it’s using the default location: the innerText of the current element.
However, you can also specify another location, like this:
<div data-o-type="object" data-l-key-name=".name">
	<div class="name">David</div>
</div>
The value .name means: “search my child elements for a class .name and, when you find it, get the innerText of that element.
So, remember when I told you components end up arising naturally in Remake.js from the way the data is organized?
Well, let’s go through one more example of a high-level component…
<div
  class="bundle"
  data-switches="bundleDetails(no-auto) bundleTimeline(no-auto) bundleLegend(no-auto) deleteBundleConfirmation(auto) bundleRevisionsChoice(auto, inlineEdit)" data-o-save-deep="singleBundle"
  data-i-choices="majorRevisionsCount minorRevisionsCount"
  data-o-type="object"
  data-o-key-bundle-id="abc123"
  data-o-key-bundle-price="300"
  data-o-key-major-revisions-count="2"
  data-o-key-major-revisions-hours="1"
  data-o-key-minor-revisions-count="2"
  data-o-key-minor-revisions-hours=".5"
  data-o-default-bundle-price="100"
  data-o-default-major-revisions-count="0"
  data-o-default-major-revisions-hours="1"
  data-o-default-minor-revisions-count="0"
  data-o-default-minor-revisions-hours="1"
>
</div>
This one is similar to the .page-data one in that it contains a lot of information. However, it’s different because instead of global preferences, it’s storing data for the component.
Let’s go through what the attributes above are doing:
- Keep track of whether the following toggles are activated or deactivated: bundle details, bundle timeline, bundle legend, the delete confirmation, and a choice between which revision type to edit.
- When the data on or inside this element is changed, serialize all of the this element’s data AND nested data and save it using a function called
singleBundle() - Allow the user to select among multiple choices inside this element regarding whether the major revisions section is shown or not and whether the minor revisions section is shown or not.
- Parse the data on this element as an object
- Store the following keys inside the parsed object: bundleId, bundlePrice, majorRevisionsCount, majorRevisionsHours, minorRevisionsCount, and minorRevisionsHours.
- If there’s an invalid value for any of the above keys, set a default value for them.
And that’s it!
Now, earlier we mentioned the use of data-l (location) keys that keep track of data, but store that data inside the DOM — like in the innerText — instead of as the attribute value.
How come we’re not doing that here?
Well, we were at first, but then it turned we needed to do some funky things, including:
- Summing the major and minor revisions count to get the total number of revisions
- Formatting the price so that if it’s above 1000, it gets a comma, like so: 1,000
- Showing the price in more than one place
With data-l attributes, we had no way of modifying the data before it was displayed. The displayed data was simply the data and that’s it. There’s no in between.
In order to get around this problem, we store the values in regular data-o attributes and then use data-w (watch) attributes to detect changes and modify values whenever anything changes.
So, if the price changes on this .bundle element, for example, a child nested inside the .bundle element might have a data-w (watch) attribute that looks like this: data-w-key-bundle-price="formatPrice".
This means: “Hey, if any of my parents data changes and that change happened to a key called bundlePrice, then please call my function formatPrice.”
Then, formatPrice() will use the new value for bundlePrice, format it like a currency, and — in this case — insert it into the element with the data-w-key-bundle-price attribute on it.
Pretty neat, right?
For adding the revisions counts together, we do something similar, but attaching BOTH the data-w-key-major-revisions-count AND data-w-key-minor-revisions-count attributes to it and using a sumRevisions() function. sumRevisions looks at the top-level revisions counts and adds them together, using the sum as the value of the current element.
It’s easy once you get the hang of it.
So, now let’s move on to the main problem I want to address with this post: Theming.
So, to make a theme, we have a few options:
- (easiest) Simply remove the existing styles from whatever you want to theme, and then write new styles, using the same DOM structure.
- Do the same as step #1, but add a few new nodes to the DOM structure and hide others, so you can have an easier time styling things because they’re arranged exactly how you want them.
- Render a totally different DOM structure based on the theme.
The first option is nice, but it’s a little hard to work with because you might have to add some tricky CSS here or there because the structure of the elements doesn’t match how you would’ve built it if you were starting from scratch.
The second option is perfect, in my view, because it involves changing only a few things — most of the DOM structure is probably fine — and by duplicating things you’re not really causing too much of an issue. You’ll be namespacing the theme using a global class anyways, so it should be relatively easy to hide certain elements depending on which global class is present.
The third option is nice… but it’s a lot harder to maintain. Now, every time you want to change the structure of the original DOM, you have to think about whether you ALSO want to change the other themes’ structures — and this goes for EVERY theme. The problem in this case isn’t really going through every theme, although that’s certainly annoying. It’s that it’s hard to remember. When you’re in the moment, changing something, it’s really hard to remember that the code exists elsewhere and was just kind of duplicated.
Also, another problem with the third option is: what about the case where you don’t need to change the DOM structure? Do you still duplicate all the code? Or do you use a combination of option one AND option two? Things get complicated fast.
Okay, so, with that in mind, I chose option two. It feels a tiny bit hacky because there’ll be a lot of CSS and HTML overlapping each other, but as long as 90-100% of the CSS is namespaced and doesn’t affect the other themes, I think it should be fine and the easiest to work with long term.
So, now we’re talking about duplicating elements inside a parent component and then conditionally hiding or showing them.
Here’s the main question: How do we get the data these elements need to be inside of them?
Well, we just saw and used data-w (watch) attributes for this and it was pretty easy.
All we’d need to do is attach a data-w attribute to each of the elements that need its value and then everything should work fine.
I think, now that I’m here talking about it, that works pretty well, and I don’t mind it as a solution. However, I’d like to explore one other solution: data-f and data-c attributes.
These are new attributes, not yet introduced into the code, and this post is meant to help me think through if they make sense at all.
The idea would be:
data-f(format) attributes would compute formatted values based on one or more other values. They’d be kind of likedata-wattributes, but have less power. Whiledata-wattributes can do anything,data-fattributes’ purpose is only to provide an intermediate value.data-c(copy) attributes would copy data fromdata-o,data-l, anddata-fattributes into themselves. Their ONLY purpose would be to copy data — that’s it.
Now, I’m a bit skeptical about inventing new data attributes. The ones I have already do a lot and work well enough. I’d prefer to keep this framework from expanding further if possible. However, the question here is whether these new attributes would add enough value in terms of simplicity to be worth the extra intial confusion when learning the framework — and provide much needed helpers to more experienced users.
The #1 good thing about them is they simplify what most data-w (watch) attributes are already doing into two explicit & simple steps.
Most data-w attributes aren’t doing anything crazy, they’re copying data or computing a new value from existing data and then copying that into themselves.
However, when you, as a developer, are looking at a data-w attribute, you have no idea what it’s doing. It could be using data from the current component, from the global scope, or even from an API or other source.
When you look at the top level of a component though and you see a bunch of data-f attributes, you would know that those computed values are being used inside the element somewhere. And nothing extra is happening. Also, you could pretty safely ignore all data-c attributes. They’re just copying data into themselves — not modifying the DOM, switching things on or off, adding classes, or anything else JS can do. Even though you can, of course, establish some best practices around how your team uses data-w attributes, it’s safer to just know what can and cannot be happening just by looking at the page.
Even if we add these new attributes, we’ll still need data-w attributes for some more complex cases, but if they handle 90% of data copying/formatting cases, then I think they’ll end up making things clearer than they are now.
The other minor benefit (and I say minor because this framework certainly wasn’t designed with performance as the #1 goal) is that you won’t have duplicate data-w attributes with duplicate the same functions inside them, which will each need to be called separately. You’ll compute the data inside the data-f attribute AND THEN pass the intermediate value down into the component. So, it will only be computed once. That’s kind of nice.
So, how would it look?
Let’s use a simple example (first, using data-w attributes):
<div
  data-o-type="object"
  data-o-key-price1="100"
  data-o-key-price2="200"
>
	<div
		data-w-key-price1="sumPrices"
		data-w-key-price2="sumPrices"
	>300</div>
</div>
In the above example, we’d store both prices at the top level, and then use data-w attributes to see when either changed. When they did, we’d sum them and add them to the current element’s innerText.
Now, to rework this using data-f (format) and data-c (copy) attributes:
<div
  data-o-type="object"
  data-o-key-price1="100"
  data-o-key-price2="200"
  data-f-key-total-price="price1 price2 | sum"
>
	<div
		data-c-key-total-price
	>300</div>
</div>
This is pretty similar, however it’s kind of nice to see ALL the data that’s being passed down into the component, like the total price, upfront — instead of having to look inside the (possibly messy) component and hunt for the place where the total price is being computed.
The thing I don’t like the most is the syntax of the data-f attribute. I like that it creates a new key, but I don’t like its value’s syntax.
I suppose there are other options, like these:
data-f-key-total-price="sum(price1, price2)"data-f-key-total-price="price1 price2
In this first option, we’d pass the keys directly to a function, which I guess feels more natural.
And in the second option we’d automatically generate a function to be called named after the new key… something like computeTotalPrice(). The function name wouldn’t be specified directly in this case. That would be kind of a bummer because it would make what’s happening slightly less explicit.
Anyways… the other thing I don’t like is all the new attributes. They make sense to me, but I worry that introducing them adds an extra layer of complication. It’s nice for more advanced use cases and more experienced users, but for beginners, it’d probably be hard to understand why you’d these new attributes. And, if possible, it’d be great to only have a few attributes to learn to get started and be productive with this framework.
This latter point can be address by simply hiding these attributes from new users and only introducing them long after they’ve learned about the more powerful data-w attribute.
I’m not sure if it’s worth it.
From my perspective, as a developer, I think I slightly prefer the new data-f and data-c attributes. It’s really nice to be able to see ALL the data inside your component with just a single glance. Having deeply nested data-w attributes doesn’t really provide this. However, as “extra” data that isn’t saved when the element is serialized, I’m not sure how much that data matters.
So, for now, let’s just say this syntax is my favorite for data-f attributes: data-f-key-total-price="sum(price1, price2)" and I think data-f and data-c attributes are barely worthly of being included in the main library. I’m not sure when or if I’ll add them, but it was fun to think through them and figure out a new way of doing things.
Thanks for reading!
]]>It started out with just a simple positioning library. I wanted to be able to position popovers. Then I added another library that would handle setting element dimensions on
]]>It started out with just a simple positioning library. I wanted to be able to position popovers. Then I added another library that would handle setting element dimensions on popovers automatically.
Then, I added the big one, or what I thought was the big one: Widget.js.
Widget.js (later renamed Switch.js) had been used in many projects at that point, including the original version of Artisfy.
What did it do?
It’s very simple, really. It would let you click a button to activate a widget. If you clicked inside that widget, you could interact with it, but, if you clicked outside of it, it would close.
Very simple stuff. It basically was a very, very short piece of code that stood in for code that I would write over and over and over again.
But then, it got more complicated.
Sometimes I wanted to click somewhere else and have the widget close, but sometimes I didn’t want it to close. Sometimes I wanted to activate multiple widgets at the same time.
Anyways, it turned into a big piece of code that’s actually really elegant in what it does.
This, however, didn’t constitute a framework. All I had was the ability to activate or deactivate some widgets on the page and position them.
It only turned into a framework when I started thinking about DATA.
It started out simply enough.
I had this beautiful idea for a web framework:
What if I could make a webpage, edit that webpage, and then just save the edited webpage?
Isn’t this how all web apps work though?
Well, yes, but this one took things to a whole different level of literalness. Most web apps let you edit DATA and then save the DATA — and then display that data in a visible format.
But, what I was thinking was:
What if I just bundle up everything together and save it all at once? Then there would just be one source of truth: the webpage.
If you’re not understanding yet, this is how it’d work:
- Load up a webpage
- Click a button to edit some area on the webpage
- Edit the text in that area and press save
- The ENTIRE webpage’s code would be saved to the server
But… this is insane… isn’t it?
Well, not really. It’d let you make simple, interactive webpages very, very quickly. All you would need is HTML, CSS, and the ability to change the HTML. No database, no schema, no back and forth with the server. All the data in on the webpage and it’s all saved. What the user sees is what they get the next time around.
You’d only want to give people access who you trusted, of couse, because they could add ANY code they wanted, including external JavaScript that was meant to steal passwords.
But, even that, could be prevented. You could use a content security policy on modern browsers to make sure no external scripts were added. And you could take the extra precaution of stripping out dangerous code with DOMPurify or something.
The elegance of this solution was beautiful to me. As a front-end developer who doesn’t like messing around with databases and sessions, it was perfect for creating quick, one-off projects.
It was as simple as: “Edit HTML, Save HTML.”
What about authentication? Well, the server could handle that.
And when you get an admin user, you add certain classes to the HTML that show them the edit controls.
And, when you get a regular user, you strip all the admin classes out of the document.
It was pretty sleek.
… But I ran into a problem: What about using data in more than one place?
What if I have a webpage with a username and then on the very next page I want to display the same username? Do I force the user to change it twice? That’s very unintuitive… People have gotten used to thinking in terms of settings and preferences that are persistant and global. People don’t really think that webpages are each just separate documents.
But! There’s a solution for that too! You could use the webpage as a database and query it. So, if you’re looking for the username, just keep track of its element’s selector and pass that into your template… Then you could search through other pages’ data using a document query syntax, just like you’re working on the front-end.
However, it’s not that simple. Here’s why:
- At some point you’ve got to wonder what you’re doing with your life if you’re slowly reinventing something like PHP from scratch. PHP isn’t bad, but it’s already out there. And it has support for templates and stuff out of the box. If I’m slowly going to be creating something different, but not better, and gradually adding on features until it’s comparable to something that already exists… what am I doing?
- You’d need a single source of truth for your data. So, if you have a username and you want to use it in multiple places and you’re going to query a webpage for it… you need that webpage you’re querying to be the only source of truth and the other pages to be dependent on it.
Of course, there are ways around the 2nd point.
And the 1st point is like… whatever. It’s still nice to have new things in the world even if other things exist that can do the same thing. You never know if the new thing will be better in some way… eventually.
Anyways, though, I decided against implementing it because it sounded like too much work for me… especially back-end work, with lots of data and complicated configurations and security implications. Stuff I’d rather not be responsible for at the end of the day. The risk of a mistake is too high.
However, it’s still a good idea, especially for lightweight demos:
- Edit a page on the front-end
- Save the resulting webpage
- Strip out any admin/active classes between page loads
Boom! Web framework!
So, I think this is something I’d like to work on eventually, some day.
But, let’s get back to my journey to creating a framework.
So, here I was, feeling a little despondent that my idea of saving a while webpage wouldn’t work, especially because of the whole “how do you reference state from two different places?” problem.
And… I came up with an idea.
At the end of the day, I’d be rendering back-end templates anyways, which support variables and interpolation and stuff. So, why not just find a way to markup my pages, so I could quickly extract the data from them… and then feed this into the back-end templates?
I know… I know… I’m not saying anything new again. This is how ALL web apps work… haha.
But, it was a little bit different… because I was thinking about making it automatic, so you wouldn’t even notice… So, it would be almost as simple as just saving a webpage.
Anyways, without further ado, this is what I came up with:
<div data-o-type="list">
	<div data-o-type="object" data-o-key-name="David"></div>
	<div data-o-type="object" data-o-key-name="John"></div>
	<div data-o-type="object" data-o-key-name="Sam"></div>
</div>
Making up the HTML with these data-o-type attributes would allow a custom parser I’d write to quickly and easily extract the data from the DOM that was necessary to render it again…
Basically, it would capture everything about a webpage that the server needed to render that page.
If you’re curious about what the o in the data-o stands for, it’s “output”. That’s because it’s data that’s being output from the DOM, as opposed to inputted by the user (we’ll get to that later).
So, let’s talk about what the above piece of HTML would look like as data.
First, we define a list with data-o-type="list".
Then, inside of that are some objects, with data-o-type="object" on them.
That means we’ve got some objects inside a list.
Pretty easy, right?
The key thing to notice is how the structure of the data corresponded to the structure of the DOM. If there’s a nested DOM node, it most likely belongs inside of the DOM node above it. Or, at least, at the same level. So, that’s what this library (Remake.js) assumes.
Here’s what the above elements look like as actual data:
[
	{name: "David"},
	{name: "John"},
	{name: "Sam"}
]
And, here’s what the back-end template that would render this might look like:
div(data-o-type="list")
  each val in ["David", "John", "Sam"]
    div(data-o-type="object" data-o-key-name=val)
(This is pugjs btw).
How useful is though? I mean you’re storing data in the attribute, but it’s not on the actual page… It’s not displayed anywhere…
Well, in order to address that, we have data-l-key-* attributes, which, by default, look for their value in the innerText of the current element (but can be told to look elsewhere).
So, now, instead of the original HTML example, you could use something like this:
<div data-o-type="list">
	<div data-o-type="object" data-l-key-name>David</div>
	<div data-o-type="object" data-l-key-name>John</div>
	<div data-o-type="object" data-l-key-name>Sam</div>
</div>
And this will give you the exact same output:
[
	{name: "David"},
	{name: "John"},
	{name: "Sam"}
]
Which you can feed into your back-end template, which now looks like this:
div(data-o-type="list")
  each val in ["David", "John", "Sam"]
    div(data-o-type="object" data-o-key-name)=val
And that’s it!
Now you have the ability to write some HTML, attach a few data attributes that make that HTML serializeable, so you can extract the data from your HTML, and feed it back into your templates. It’s a really lightweight framework… kind of.
:)
Next time we’ll talk about some features I’ve been thinking about building. Also, we’ve barely scratched the surface of this project and its capabilities. In fact, I build an entire application using this framework which is in production right now.
And, while it does have its faults (it’s getting a little hard to put all the pieces together sometimes and it does some hacky things like storing all data as strings…), it’s been a real pleasure to work with and made it 100% faster for me to build new features.
However, the next features I’m building for it are meant to address some of the problems I’ve run into when thinking about adding themes to my application.
I’ll talk more about that in the next post.
]]>